Swaggard
Swaggard is a Rails Engine that can be used to document a REST api. It does this by generating a json that is compliant with Swagger and displaying it using Swagger-ui. This gem is inspired and based on SwaggerYard by Chris Trinh.
Compatibility
This table tracks the version of Swagger UI used on each Swaggard version and the supported rails version.
| Swaggard Version | Swagger UI Version | Supported Rails Versions |
|---|---|---|
| 1.1.x | 2.2.8 | 4 - 6 |
| 1.0.x | 2.2.8 | 4 - 5 |
| 0.5.x | 2.2.8 | 4 - 5 |
| 0.4.x | 2.2.8 | 4 |
| 0.3.x | 2.1.3 | 4 |
| 0.2.x | 2.1.3 | 4 |
| 0.1.x | 2.1.3 | 4 |
| 0.0.x | 2.1.8-M1 | 4 |
Installation
Put Swaggard in your Gemfile:
gem 'swaggard'
Install the gem with Bundler:
bundle install
Getting Started
First generate a Swaggard configuration initializer file.
rails g swaggard:install
This will install the file swaggard.rb to your Rails config/initializers directory which you can then alter the config.
Mount your engine
# config/routes.rb

mount Swaggard::Engine, at: '/api_docs/swagger/'
Make sure the asset pipeline is enabled by either requiring all railties or just the sprockets one:
# config/application.rb

require 'sprockets/railtie'
Access your service documentation
open http://localhost:3000/api_docs/swagger/
Access the raw swagger json
open http://localhost:3000/api_docs/swagger.json
Example
By just using Swaggard you'll get documentation for the endpoints that exist on your service: http method, path, path params. And grouping will be done based on the controller that holds each path.
This is fine base but you should add more documentation in order to provide more information of the expected inputs and outputs or even change the grouping of the endpoints.
Here is a example of how to use Swaggard
# config/routes.rb

resources :users, only: [] do
  resources :posts, controller: 'users/posts', only: [:index, :create]
end


# app/controllers/users/posts_controller.rb

# @tag UsersPosts
# API for creating, deleting, and listing user posts.
class Users::PostsController < ActionController::Base

  # Returns the list of user posts
  #
  # @response_status 201
  # @response_root posts
  # @response_class Array<PostSerializer>
  def index
    ...
  end

  # Create user post
  #
  # @body_parameter [string] title
  # @body_parameter [string] body
  # @body_parameter [string] topic_id
  #
  # @response_class PostSerializer
  def create
    ...
  end

end


# app/serializers/post_serializer.rb

# @attr [integer] id
# @attr [string] title
# @attr [string] body
# @attr [date-time] created_at
# @attr [date-time] updated_at
# @attr [TopicSerializer] topic
class PostSerializer < ActiveModel::Serializer

  attribute :id
  attribute :title
  attribute :body
  attribute :created_at
  attribute :updated_at

  has_one :topic, serializer: TopicSerializer

end


# app/serializers/topic_serializer.rb

# @attr [integer] id
# @attr [string] name
# @attr [date-time] created_at
# @attr [date-time] updated_at
class TopicSerializer < ActiveModel::Serializer

  attribute :id
  attribute :name
  attribute :created_at
  attribute :updated_at

end
Will generate
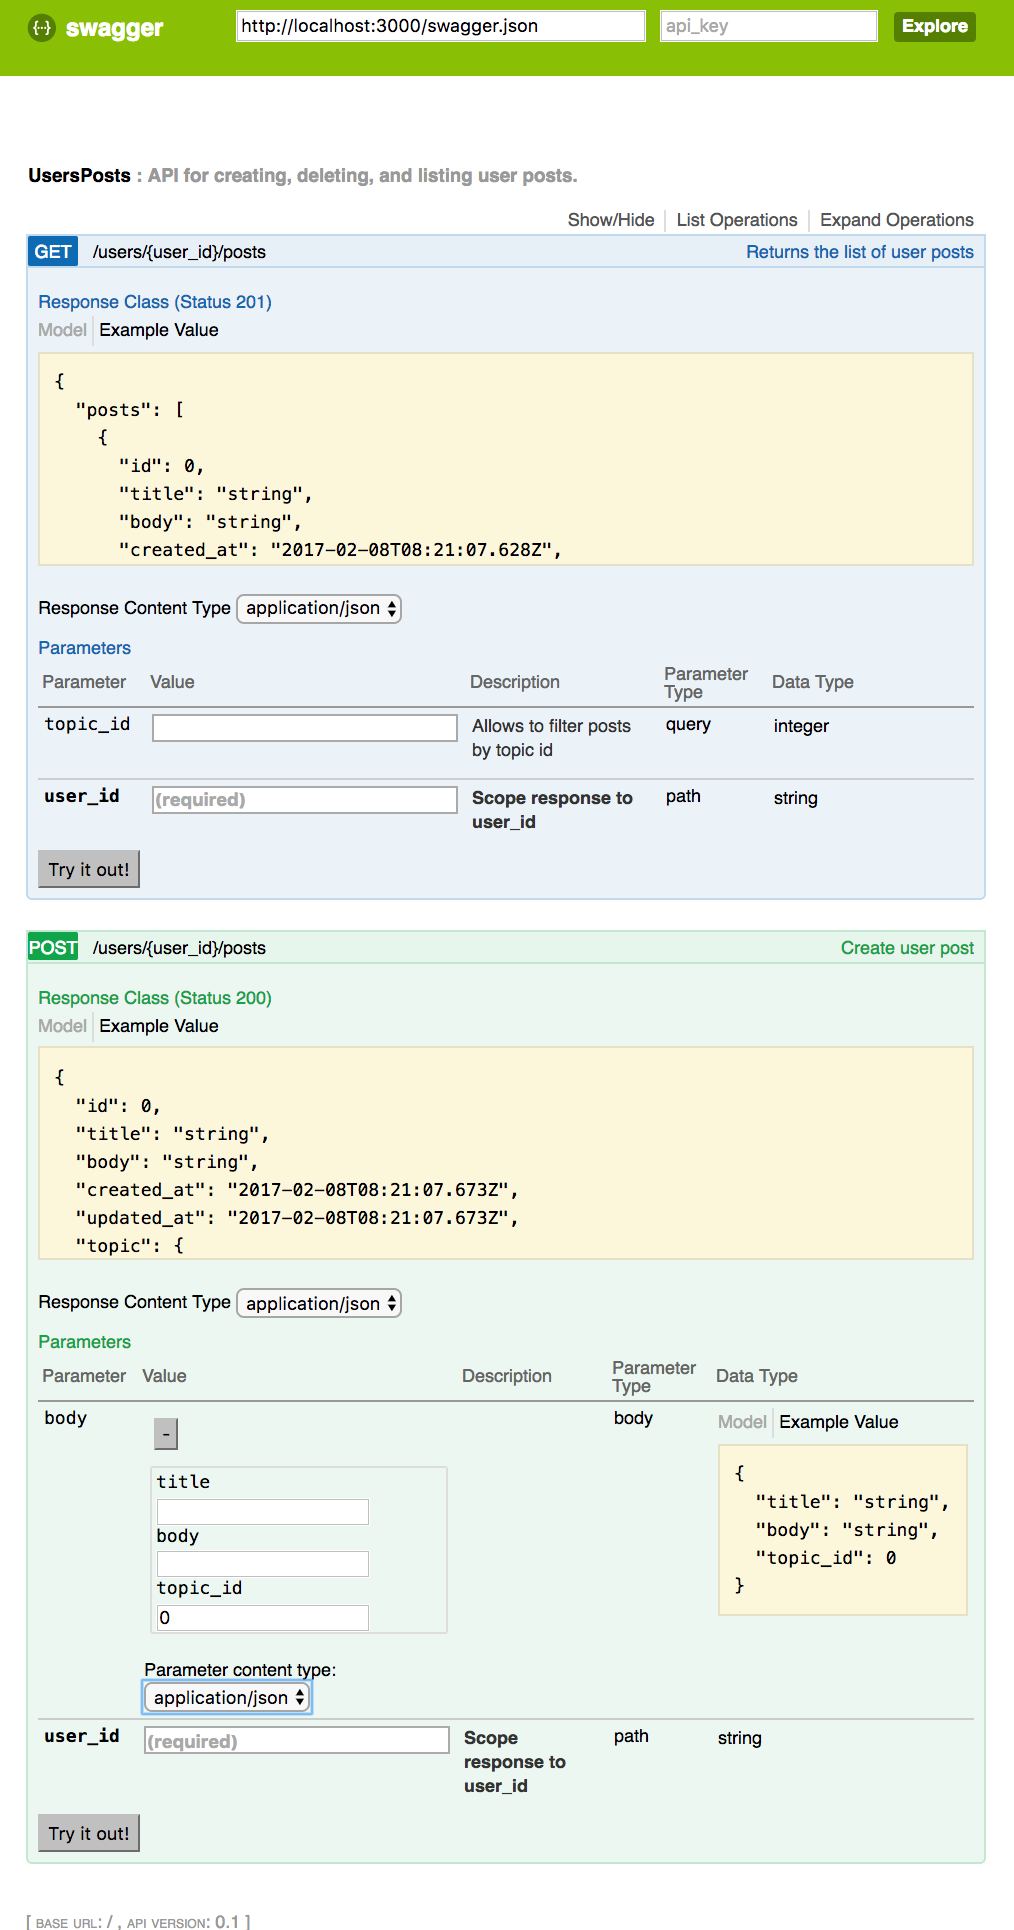
Available tags
Controllers
@tag nameThis is used to indicate under whatnametag this controller needs to be grouped. If not provided it will use the full controller class name.@query_parameter [type] nameThis is used to indicate that your action receives thenameparameter oftypeon the query string.@body_parameter [type] nameThis is used to indicate that your action receives thenameparameter oftypeon the body.@response_class typeThis is used to indicate that your action returns a response oftype.@response_status 200This is used to indicate the response code of your action when everything goes well.@response_root nameThis is used to indicate that your action returns its response inside a root key elementname. If not provided the root is omitted and the response its returned directly.@form_parameter@parameter_list
Models
@attr [type] nameThis is used to indicate that your models has an attributenameoftype.
Primitives
When one of these types is given Swaggard will handle them directly instead of searching for a definition:
- integer
- long
- float
- double
- string
- byte
- binary
- boolean
- date
- date-time
- password
- hash
Authentication
Swaggard supports two types of authentication: header and query.
You can configure it as follows:
# config/initializers/swaggard.rb
Swaggard.configure do |config|
  config.authentication_type  = 'header' # Defaults to 'query'
  config.authentication_key   = 'X-AUTH-TOKEN' # Defaults to 'api_key'
  config.authentication_value = 'your-secret-key' # Initial value for authentication. Defaults to ''
end
Even if you provide a authentication_value you can later change it from the ui.
Access authorization
Swaggard supports access authorization.
You can configure it as follows:
# config/initializers/swaggard.rb
Swaggard.configure do |config|
  config.access_username  = 'admin'
  config.access_password   = 'password'
end
If you not set access_username, everyone will have access to Swagger documentation.
Additional parameters
Swaggard supports additional parameters to be sent on every request, either as a header or as part of the query.
You can configure it as follows:
# config/initializers/swaggard.rb
Swaggard.configure do |config|
  config.additional_parameters = [{ key: 'TOKEN', type: 'header', value: '234' }]
end
type can be 'header' or 'query'. If value is provided then it will be used as a default. You can change/set the value for the parameters in the ui.
Default content type
You can set default content type in Swaggard configuration as follows:
# config/initializers/swaggard.rb
Swaggard.configure do |config|
  config.default_content_type = 'application/json'
end
If you set default_content_type, Swagger will use it in example request.
Language
You can set the language for SwaggerUI as follows:
# config/initializers/swaggard.rb
Swaggard.configure do |config|
  config.language = 'es'
end
The default value is: 'en'. Supported values are:
- ca
- el
- en
- es
- fr
- geo
- it
- ja
- ko-kr
- pl
- pt
- ru
- tr
- zh-cn
Caching
You can improve Swagger performance by using caching. You can enable use_cache in Swaggard configuration as follows:
# config/initializers/swaggard.rb
Swaggard.configure do |config|
  config.use_cache = Rails.env.production?
end
If you set use_cache as Rails.env.production?, Swagger will use cache only in production mode.
Note. For cache clearing you can execute rake swaggard:clear_cache.
Documentation Scoping
Its possible to only generate Swagger documentation for a subset of your application controllers
to do this you just need to use the controllers_path config option.
For instance to only generate documentation for the controllers under app/controllers/api you
need do this:
# config/initializers/swaggard.rb
Swaggard.configure do |config|
  ...
  config.controllers_path = "#{Rails.root}/app/controllers/api/**/*.rb"
  ...
end
The default value for controllers_path is "#{Rails.root}/app/controllers/**/*.rb".
More Information
Author
Credits
Chris Trinh author of SwaggerYard in which this gem is inspired and used a base.