Prophet.rb
Time series forecasting for Ruby, ported from Prophet
Supports:
- Multiple seasonalities
- Linear and non-linear growth
- Holidays and special events
And gracefully handles missing data
![]()
Installation
Add this line to your application’s Gemfile:
gem "prophet-rb"
Simple API
Forecasting
Get future predictions for a time series
series = {
  Date.parse("2020-01-01") => 100,
  Date.parse("2020-01-02") => 150,
  Date.parse("2020-01-03") => 136,
  # ...
}

Prophet.forecast(series)
Specify the number of predictions to return
Prophet.forecast(series, count: 3)
Works great with Groupdate
series = User.group_by_day(:created_at).count
Prophet.forecast(series)
And supports advanced API options
Prophet.forecast(series, growth: "logistic", weekly_seasonality: false)
Anomaly Detection
Detect anomalies in a time series
Prophet.anomalies(series)
Specify the width of uncertainty intervals (decrease for more anomalies)
Prophet.anomalies(series, interval_width: 0.99)
Also supports advanced API options
Prophet.anomalies(series, growth: "logistic", weekly_seasonality: false)
Advanced API
Check out the Prophet documentation for a great explanation of all of the features. The advanced API follows the Python API and supports the same features. It uses Rover for data frames.
- Quick Start
- Plots
- Saturating Forecasts
- Trend Changepoints
- Holidays and Special Events
- Multiplicative Seasonality
- Uncertainty Intervals
- Outliers
- Non-Daily Data
- Diagnostics
- Additional Topics
Advanced Quick Start
Create a data frame with ds and y columns - here’s an example you can use
df = Rover.read_csv("example_wp_log_peyton_manning.csv")
df.head
| ds | y |
|---|---|
| 2007-12-10 | 9.59076113 |
| 2007-12-11 | 8.51959031 |
| 2007-12-12 | 8.18367658 |
| 2007-12-13 | 8.07246736 |
| 2007-12-14 | 7.89357207 |
Fit a model
m = Prophet.new
m.fit(df)
Make a data frame with a ds column for future predictions
future = m.make_future_dataframe(periods: 365)
future.tail
| ds |
|---|
| 2017-01-15 |
| 2017-01-16 |
| 2017-01-17 |
| 2017-01-18 |
| 2017-01-19 |
Make predictions
forecast = m.predict(future)
forecast[["ds", "yhat", "yhat_lower", "yhat_upper"]].tail
| ds | yhat | yhat_lower | yhat_upper |
|---|---|---|---|
| 2017-01-15 | 8.21192840 | 7.52526442 | 8.92389960 |
| 2017-01-16 | 8.53696359 | 7.79124970 | 9.22620028 |
| 2017-01-17 | 8.32439891 | 7.62482699 | 9.04719328 |
| 2017-01-18 | 8.15702395 | 7.40079968 | 8.91301650 |
| 2017-01-19 | 8.16900433 | 7.45673678 | 8.83486188 |
Plots
For plots, install the matplotlib gem.
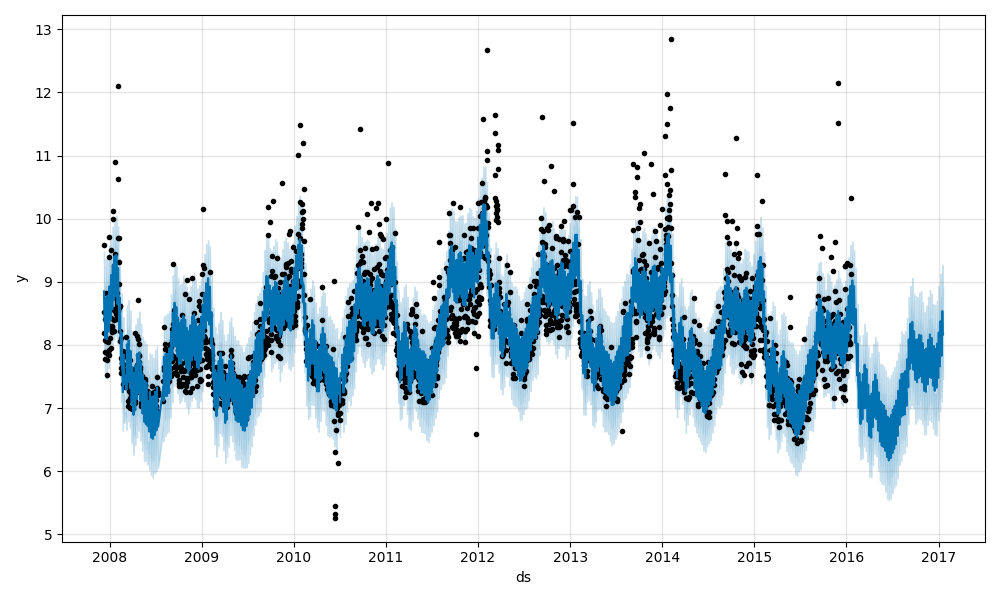
Plot the forecast
m.plot(forecast).savefig("forecast.png")
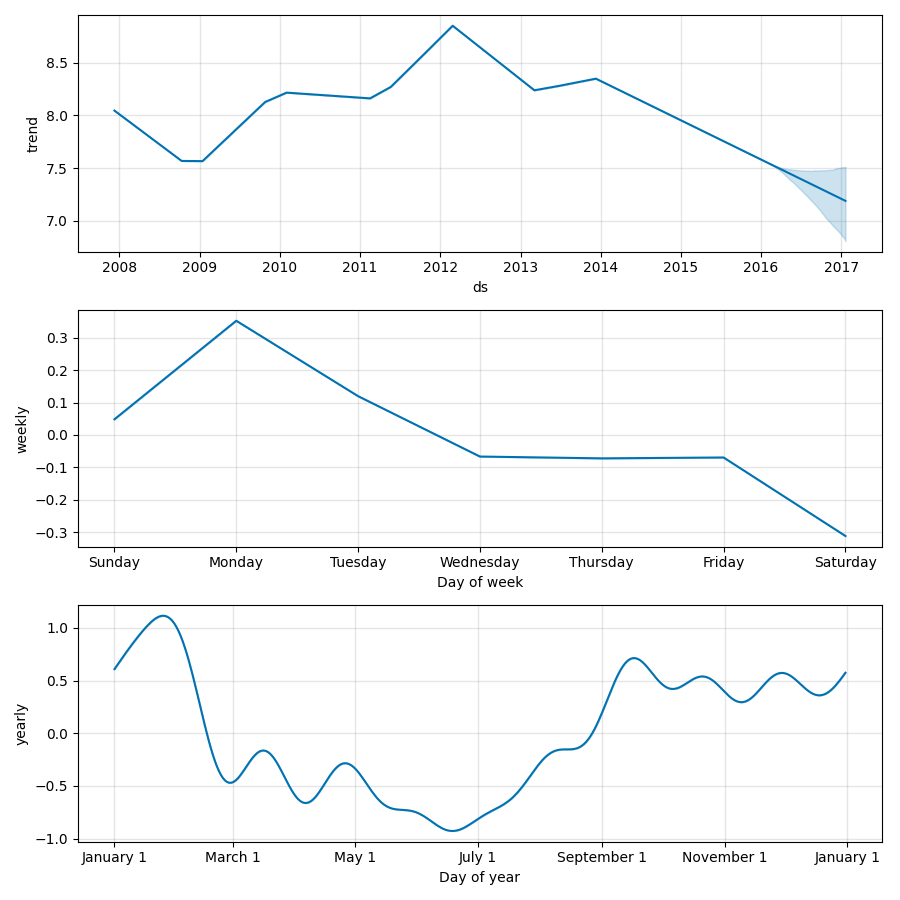
Plot components
m.plot_components(forecast).savefig("components.png")
Saturating Forecasts
Forecast logistic growth instead of linear
df = Rover.read_csv("example_wp_log_R.csv")
df["cap"] = 8.5
m = Prophet.new(growth: "logistic")
m.fit(df)
future = m.make_future_dataframe(periods: 1826)
future["cap"] = 8.5
forecast = m.predict(future)
Saturating minimum
df["y"] = 10 - df["y"]
df["cap"] = 6
df["floor"] = 1.5
future["cap"] = 6
future["floor"] = 1.5
m = Prophet.new(growth: "logistic")
m.fit(df)
forecast = m.predict(future)
Trend Changepoints
Plot changepoints
fig = m.plot(forecast)
m.add_changepoints_to_plot(fig.gca, forecast)
Adjust trend flexibility
m = Prophet.new(changepoint_prior_scale: 0.5)
Specify the location of changepoints
m = Prophet.new(changepoints: ["2014-01-01"])
Holidays and Special Events
Create a data frame with holiday and ds columns. Include all occurrences in your past data and future occurrences you’d like to forecast.
playoffs = Rover::DataFrame.new(
  "holiday" => "playoff",
  "ds" => [
    "2008-01-13", "2009-01-03", "2010-01-16",
    "2010-01-24", "2010-02-07", "2011-01-08",
    "2013-01-12", "2014-01-12", "2014-01-19",
    "2014-02-02", "2015-01-11", "2016-01-17",
    "2016-01-24", "2016-02-07"
  ],
  "lower_window" => 0,
  "upper_window" => 1
)
superbowls = Rover::DataFrame.new(
  "holiday" => "superbowl",
  "ds" => ["2010-02-07", "2014-02-02", "2016-02-07"],
  "lower_window" => 0,
  "upper_window" => 1
)
holidays = playoffs.concat(superbowls)

m = Prophet.new(holidays: holidays)
m.fit(df)
Add country-specific holidays
m = Prophet.new
m.add_country_holidays("US")
m.fit(df)
Specify custom seasonalities
m = Prophet.new(weekly_seasonality: false)
m.add_seasonality(name: "monthly", period: 30.5, fourier_order: 5)
forecast = m.fit(df).predict(future)
Specify additional regressors
nfl_sunday = lambda do |ds|
  date = ds.respond_to?(:to_date) ? ds.to_date : Date.parse(ds)
  date.wday == 0 && (date.month > 8 || date.month < 2) ? 1 : 0
end

df["nfl_sunday"] = df["ds"].map(&nfl_sunday)

m = Prophet.new
m.add_regressor("nfl_sunday")
m.fit(df)

future["nfl_sunday"] = future["ds"].map(&nfl_sunday)

forecast = m.predict(future)
Multiplicative Seasonality
Specify multiplicative seasonality
df = Rover.read_csv("example_air_passengers.csv")
m = Prophet.new(seasonality_mode: "multiplicative")
m.fit(df)
future = m.make_future_dataframe(periods: 50, freq: "MS")
forecast = m.predict(future)
Specify mode when adding seasonality and regressors
m = Prophet.new(seasonality_mode: "multiplicative")
m.add_seasonality(name: "quarterly", period: 91.25, fourier_order: 8, mode: "additive")
m.add_regressor("regressor", mode: "additive")
Uncertainty Intervals
Specify the width of uncertainty intervals (80% by default)
Prophet.new(interval_width: 0.95)
Get uncertainty in seasonality
Prophet.new(mcmc_samples: 300)
Outliers
Remove outliers
df = Rover.read_csv("example_wp_log_R_outliers1.csv")
df["y"][(df["ds"] > "2010-01-01") & (df["ds"] < "2011-01-01")] = Float::NAN
m = Prophet.new.fit(df)
Non-Daily Data
Sub-daily data
df = Rover.read_csv("example_yosemite_temps.csv")
m = Prophet.new(changepoint_prior_scale: 0.01).fit(df)
future = m.make_future_dataframe(periods: 300, freq: "H")
forecast = m.predict(future)
Diagnostics
Cross validation
df_cv = Prophet::Diagnostics.cross_validation(m, initial: "730 days", period: "180 days", horizon: "365 days")
Custom cutoffs
cutoffs = ["2013-02-15", "2013-08-15", "2014-02-15"].map { |v| Time.parse("#{v} 00:00:00 UTC") }
df_cv2 = Prophet::Diagnostics.cross_validation(m, cutoffs: cutoffs, horizon: "365 days")
Get performance metrics
df_p = Prophet::Diagnostics.performance_metrics(df_cv)
Plot cross validation metrics
Prophet::Plot.plot_cross_validation_metric(df_cv, metric: "mape")
Hyperparameter tuning
param_grid = {
  changepoint_prior_scale: [0.001, 0.01, 0.1, 0.5],
  seasonality_prior_scale: [0.01, 0.1, 1.0, 10.0]
}

# Generate all combinations of parameters
all_params = param_grid.values[0].product(*param_grid.values[1..-1]).map { |v| param_grid.keys.zip(v).to_h }
rmses = [] # Store the RMSEs for each params here

# Use cross validation to evaluate all parameters
all_params.each do |params|
  m = Prophet.new(**params).fit(df) # Fit model with given params
  df_cv = Prophet::Diagnostics.cross_validation(m, cutoffs: cutoffs, horizon: "30 days")
  df_p = Prophet::Diagnostics.performance_metrics(df_cv, rolling_window: 1)
  rmses << df_p["rmse"][0]
end

# Find the best parameters
tuning_results = Rover::DataFrame.new(all_params)
tuning_results["rmse"] = rmses
p tuning_results
Additional Topics
Save a model
File.write("model.json", m.to_json)
Load a model
m = Prophet.from_json(File.read("model.json"))
Uses the same format as Python, so models can be saved and loaded in either language
Flat trend
m = Prophet.new(growth: "flat")
Updating fitted models
def stan_init(m)
  res = {}
  ["k", "m", "sigma_obs"].each do |pname|
    res[pname] = m.params[pname][0, true][0]
  end
  ["delta", "beta"].each do |pname|
    res[pname] = m.params[pname][0, true]
  end
  res
end

df = Rover.read_csv("example_wp_log_peyton_manning.csv")
df1 = df[df["ds"] <= "2016-01-19"] # All data except the last day
m1 = Prophet.new.fit(df1) # A model fit to all data except the last day

m2 = Prophet.new.fit(df) # Adding the last day, fitting from scratch
m2 = Prophet.new.fit(df, init: stan_init(m1)) # Adding the last day, warm-starting from m1
Resources
Upgrading
0.2.0
Prophet now uses Rover instead of Daru. Two changes you may need to make are:
Rover.read_csvinstead ofDaru::DataFrame.from_csvdf[["ds", "yhat"]]instead ofdf["ds", "yhat"]
Credits
This library was ported from the Prophet Python library and is available under the same license.
History
View the changelog
Contributing
Everyone is encouraged to help improve this project. Here are a few ways you can help:
- Report bugs
- Fix bugs and submit pull requests
- Write, clarify, or fix documentation
- Suggest or add new features
To get started with development:
git clone https://github.com/ankane/prophet-ruby.git
cd prophet-ruby
bundle install
bundle exec rake vendor:all
bundle exec rake test