Jinda
Rails Application Generator using Freemind

Additional Extension themes also available at


Prerequisites
These versions works for sure but others may do.
- Ruby 2.7.0
- Rails 6.0.2
- MongoDB 6
- Freemind 1.0.1
Convention
- database is MongoDB
- images stored in upload directory, unset IMAGE_LOCATION in
initializer/jinda.rbto use Cloudinary - mail use Gmail SMTP, config in
config/application.rb - authentication use omniauth-identity
Sample Application
Supposed we want to create ecommerce web site, first create a Rails app without ActiveRecord
$ rails new YOURAPP -BOTJ
Add jinda to your Gemfile:
gem 'jinda', '~> 0.5.3'
For Development (most updated)
gem 'jinda', github:'kul1/jinda'
depend on your operating system, you may need to uncomment
gem 'therubyracer', :platforms => :ruby
install gems
$ bundle
generate jinda application
$ rails generate jinda:install
Then run bundle again to install additional gems added by jinda
$ bundle

(or run all with "sh install.sh" )
configure mongoid, omniauth
$ rails generate jinda:config

Please make sure mongod is running then create admin user

$ rails jinda:seed
now the application is ready, start it as any Rails application
$ rails server
go to http://localhost:3000, click Sign In on the left menu, and enter user name admin and password secret

Now open file app/jinda/index.mm using Freemind
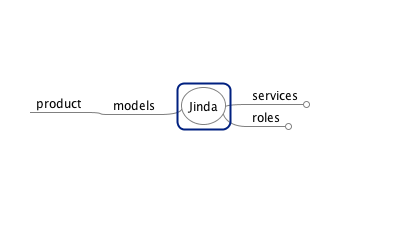
The 3 main branches are
- models - this defines all the models to use in the application
- services - this defines services which will be come the menu on the left of the screen. There will be 2 levels; the first sub branch is the main menu (modules) and the second sub branch is the sub menu (services)
- roles - this defines role for all users
models
Fiirst, we need to create some product so we click on models we'll see 2 models person and address. These are sample only. You can delete them or modify them however you want. We'll take a look at them first

The first sub branch (e.g. person) is the model name. According to Rails convention, this should be a singular word. The next sub branch are columns in the database. Let's take a look at each:
fname- this create a column (field) called fname which is a String by defaultsex: integer- this create a column called sex, it is integer so must be explicity defined. The next sub branch (1: male) is disregarded by Jinda so we can put whatever we want. Here I just put some reminder.belongs_to :address- here we have icon. this means whatever text on this line will be added as is to the model Jinda generates. You use this to specify anything you want such as association, index, remarks in code, etc. according to mongoid gem. To draw the icon, rest mouse on the branch and hit <Alt-I>.
dob: date- use any type that mongoid provides.photo- for file field, just use String here. Jinda will receive the binary file and store in file system or cloudinary then generate a url link to it.
In this example we just want a product model, so delete the person and address model and add a product branch like so
Save the mind map then run:
rake jinda:update
This will create file app/models/product.rb. In this file, note the comment lines # jinda begin and # jinda end. Everything inside these comments will get overwritten when you change the models branch in the mind map so if you need to put anything inside here, use the mind map instead. You can add anything outside these comment lines which will be preserved when doing jinda:update.
services
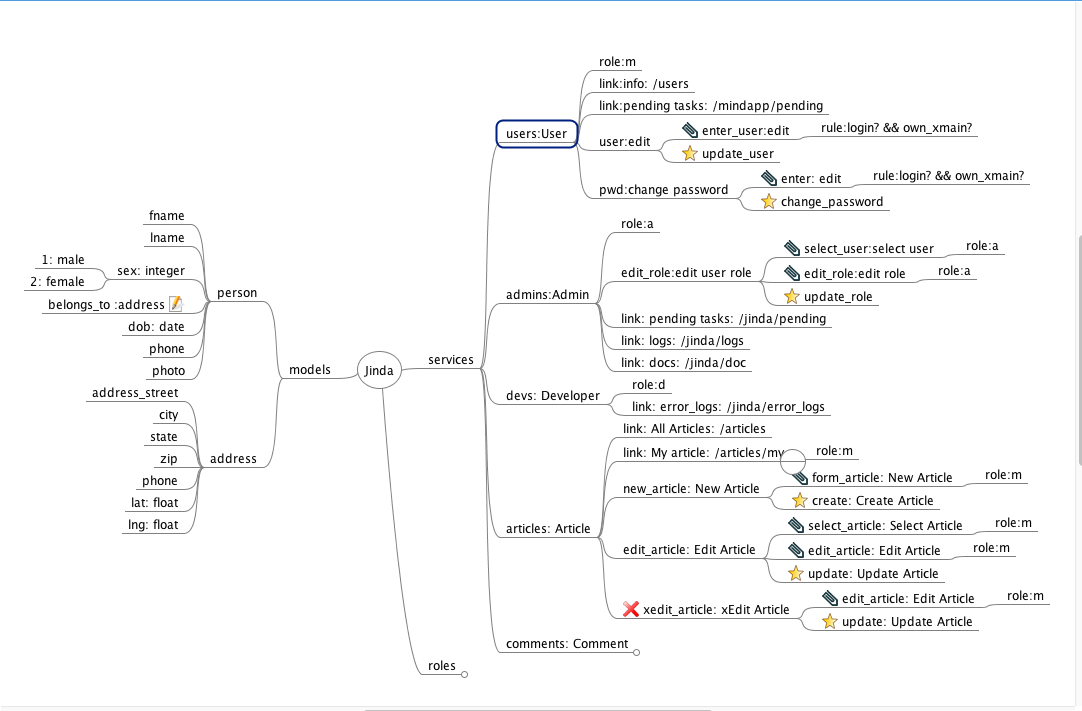
Next we'll add some product into the database, we'll first take a look at the services branch, which already has 3 sub branches; users, admins, and devs. Unlike models person and address branches, these branches are actively used by the system so I recommend that you leave them alone. Let's open the users branch

The text users:User on the sub branch has these implications:
userscorrespond toapp/controllers/users_controller.rbwhich already exist when you do rails generate jinda:install. New branch will create new controller if not exist. In Jinda term, this will be called module.Userwill create entry in main menu on the left of the screen. You don't see it in the screenshot above because it's controlled by the sub branchrole:mwhich means this menu only available for login member. If you already signed in as admin, you should see it now.
The next sub branches has the following:
role: m- means that this module (menu) is available only to user who has role m (if you open the role branch now will see that role m is member). All registered user has role m by default. User who is not log on would not be able to access this module.link:info: /users- means that this is a link, the format is link: submenu label : url where submenu label is the text to show in the submenu and url is the link to go to, in this case, it woud go to http://localhost:3000/users which will perform index action of UsersController.user:editthe branch that do not start with role:, rule:, nor link: will be a Jinda service. You will then specify the sequence of the execution as in this example there are 3 sub branches - enter_user, update_user, and rule:login? Let's take a look at them:enter_user:edit- the first step is to display a form to input user information, this is accompanied by icon which means user interface screen. and will correspond to a view file
 app/views/users/user/enter_user.html.erbwhere/userscomes from the module name (the sub branch of services),/usercomes from the service name (the sub branch of users), andenter_user.html.erbcomes from the first part of this branch. Theeditafter the colon is just a description of this step. This branch also has sub branchrule:login? && own_xmain?which specify rule for this step that the user must be login and can continue this task if he is the one who started it. task in here means each instance of service.update_user- this icon means to execute method update_user within
 users_controller.rb
Armed with this knowledge, we are ready to add new product into our application like so:

To generate controller and views we save this mind map and run
rake jinda:update
open file app/views/products/add/enter.html.erb you'll see some sample view already in there but commented. edit the file so it look like this

Note that we do not specify form_tag and submit_tag, these will be supplied by Jinda.
then open file app/controllers/products_controller.rb and add create method as follow. The method name has to be correspond to the  branch.

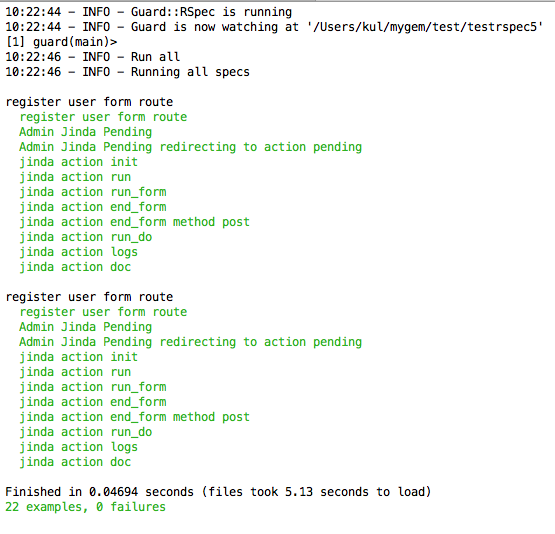
Testing
run following command:
rails generate jinda:rspec
guard init
guard
Contributing
- Fork it
- Create your feature branch (
git checkout -b my-new-feature) - Commit your changes (
git commit -am 'Add some feature') - Push to the branch (
git push origin my-new-feature) - Create new Pull Request