 Glimmer DSL for Opal 0.4.0 (Webify Desktop Apps)
![]()

You can finally live in pure Ruby land on the web!
Glimmer DSL for Opal is an experimental proof-of-concept web GUI adapter for Glimmer desktop apps (i.e. apps built with Glimmer DSL for SWT). It webifies them via Rails, allowing Ruby desktop apps to run on the web via Opal Ruby without changing a line of code. Apps may then be custom-styled for the web with standard CSS by web designers.
Glimmer DSL for Opal successfully reuses the entire Glimmer core DSL engine in Opal Ruby inside a web browser, and as such inherits the full range of powerful Glimmer desktop data-binding capabilities for the web.
NOTE: Alpha Version 0.4.0 only supports bare-minimum capabilities for the following glimmer-dsl-swt samples:
Hello:
- Hello, World!
- Hello, Combo!
- Hello, Computed!
- Hello, List Single Selection!
- Hello, List Multi Selection!
- Hello, Browser!
- Hello, Tab!
- Hello, Custom Widget!
- Hello, Custom Shell!
Elaborate:
External:
Other Glimmer DSL gems:
- glimmer-dsl-swt: Glimmer DSL for SWT (JRuby Desktop Development GUI Library)
- glimmer-dsl-tk: Glimmer DSL for Tk (Ruby Desktop Development GUI Library)
- glimmer-dsl-xml: Glimmer DSL for XML (& HTML)
- glimmer-dsl-css: Glimmer DSL for CSS (Cascading Style Sheets)
Background
The idea behind Glimmer DSL for Opal is that you start by having a Glimmer DSL for SWT desktop app that communicates with a Rails API for any web/cloud concerns. The GUI DSL is very simple in Glimmer DSL for SWT. Once the app is built. You simply embed it in a Rails app as a one line require statement after adding the Glimmer DSL for Opal gem, and BOOM, it just works on the web inside a web browser with the same server/client communication you had in the desktop app (I am working on adding minimal support for net/http in Opal so that desktop apps that use it continue to work in a web browser).
Part of the idea is that web browsers just render GUI widgets similar to those of a desktop app (after all a web browser is a desktop app), so whether you run your GUI on the desktop or on the web should just be a low-level concern, hopefully automated completely with Glimmer DSL for Opal.
Last but not least, you would likely want some special branding on the web, so you can push that off to a web designer who would be more than happy to do the web graphic design and customize the look and feel with pure CSS (no need for programming with Ruby or JavaScript). This enables a clean separation of concerns and distribution of tasks among developers and designers, let alone saving effort on the web GUI by reusing the desktop GUI as a base right off the bat.
Supported Glimmer DSL Keywords
The following keywords from glimmer-dsl-swt have partial support in Opal:
Widgets:
shelllabelcombobuttontextcompositelist&list(:multi)tab_foldertab_itemtabletable_columnmessage_box- Glimmer::UI::CustomWidget: ability to define any keyword as a custom widget
- Glimmer::UI::CustomShell: ability to define any keyword as a custom shell (aka custom window) that opens in a new browser window (tab) automatically unless there is no shell open in the current browser window (tab)
Layouts:
grid_layoutrow_layoutfill_layoutlayout_data
Graphics:
colorfont
Data-Binding/Observers:
bindobserveon_widget_selectedon_modify_text
Event loop:
displayasync_exec
Pre-requisites
- Rails 5: https://github.com/rails/rails/tree/5-2-stable
- Opal 1: https://github.com/opal/opal-rails
- jQuery 3: https://code.jquery.com/ (jQuery 3.5.1 is included in the glimmer-dsl-opal gem)
Setup
(NOTE: if you run into issues, keep in mind this is a very early experimental and incomplete alpha. Also, there is a slight chance issues you encounter are fixed in master or some other branch that you could check out instead)
Please install a Rails 5 gem:
gem install rails -v5.2.4.4
Start a new Rails 5 app:
rails new glimmer_app_server
Add the following to Gemfile:
gem 'opal-rails', '~> 1.1.2'
gem 'opal-async', '~> 1.2.0'
gem 'opal-jquery', '~> 0.4.4'
gem 'glimmer-dsl-opal', '~> 0.4.0', require: false
gem 'glimmer-dsl-xml', '~> 1.1.0', require: false
gem 'glimmer-dsl-css', '~> 1.1.0', require: false
Follow (opal-rails)[https://github.com/opal/opal-rails] instructions, basically the configuration of: config/initializers/assets.rb
Edit config/initializers/assets.rb and add the following at the bottom:
Opal.use_gem 'glimmer-dsl-opal'
Run:
rails g scaffold welcome
Modify config/routes.rb:
root to: 'welcomes#index'
Add the following line to the top of an empty app/assets/javascripts/application.rb (replacing application.js)
require 'glimmer-dsl-opal' # brings opal and other dependencies automatically
Open a Document.ready? block and add inside it Glimmer GUI DSL code or a require statement for one of the samples below.
Document.ready? do
  # require-statement/code goes here.
end
Example to confirm setup is working:
Document.ready? do
  include Glimmer

  shell {
    fill_layout
    text 'Example to confirm setup is working'
    label {
      text "Welcome to Glimmer DSL for Opal!"
      foreground :red
      font height: 24
    }
  }.open
end
Samples
Follow the instructions below to try out glimmer-dsl-swt samples webified via glimmer-dsl-opal
Also, this external sample app contains all the samples mentioned below configured inside a Rails 5 Opal app with all the pre-requisites ready to go for convenience:
https://github.com/AndyObtiva/sample-glimmer-dsl-opal-rails5-app
Some of the screenshots might be out of date with updates done to samples in both glimmer-dsl-swt and glimmer-dsl-opal.
Hello Samples
Hello, World!
Add the following require statement to app/assets/javascripts/application.rb
require 'glimmer-dsl-opal/samples/hello/hello_world'
Or add the Glimmer code directly if you prefer to play around with it:
include Glimmer

shell {
  text 'Glimmer'
  label {
    text 'Hello, World!'
  }
}.open
Glimmer app on the desktop (using glimmer-dsl-swt gem):

Glimmer app on the web (using glimmer-dsl-opal gem):
Start the Rails server:
rails s
Visit http://localhost:3000
You should see "Hello, World!"

Hello, Combo!
Add the following require statement to app/assets/javascripts/application.rb
require 'glimmer-dsl-opal/samples/hello/hello_combo'
Or add the Glimmer code directly if you prefer to play around with it:
class Person
attr_accessor :country, :country_options
def initialize
self. = ['', 'Canada', 'US', 'Mexico']
reset_country
end
def reset_country
self.country = 'Canada'
end
end
class HelloCombo
include Glimmer
def launch
person = Person.new
shell {
row_layout(:vertical) {
pack false
}
text 'Hello, Combo!'
combo(:read_only) {
selection bind(person, :country)
}
{
text 'Reset Selection'
do
person.reset_country
end
}
}.open
end
end
HelloCombo.new.launch
Glimmer app on the desktop (using glimmer-dsl-swt gem):

Glimmer app on the web (using glimmer-dsl-opal gem):
Start the Rails server:
rails s
Visit http://localhost:3000
You should see "Hello, Combo!"

Hello, Computed!
Add the following require statement to app/assets/javascripts/application.rb
require 'glimmer-dsl-opal/samples/hello/hello_computed'
Or add the Glimmer code directly if you prefer to play around with it:
class HelloComputed
  class Contact
    attr_accessor :first_name, :last_name, :year_of_birth

    def initialize(attribute_map)
      @first_name = attribute_map[:first_name]
      @last_name = attribute_map[:last_name]
      @year_of_birth = attribute_map[:year_of_birth]
    end

    def name
      "#{last_name}, #{first_name}"
    end

    def age
      Time.now.year - year_of_birth.to_i
    rescue
      0
    end
  end
end

class HelloComputed
  include Glimmer

  def initialize
    @contact = Contact.new(
      first_name: 'Barry',
      last_name: 'McKibbin',
      year_of_birth: 1985
    )
  end

  def launch
    shell {
      text 'Hello, Computed!'
      composite {
        grid_layout {
          num_columns 2
          make_columns_equal_width true
          horizontal_spacing 20
          vertical_spacing 10
        }
        label {text 'First &Name: '}
        text {
          text bind(@contact, :first_name)
          layout_data {
            horizontal_alignment :fill
            grab_excess_horizontal_space true
          }
        }
        label {text '&Last Name: '}
        text {
          text bind(@contact, :last_name)
          layout_data {
            horizontal_alignment :fill
            grab_excess_horizontal_space true
          }
        }
        label {text '&Year of Birth: '}
        text {
          text bind(@contact, :year_of_birth)
          layout_data {
            horizontal_alignment :fill
            grab_excess_horizontal_space true
          }
        }
        label {text 'Name: '}
        label {
          text bind(@contact, :name, computed_by: [:first_name, :last_name])
          layout_data {
            horizontal_alignment :fill
            grab_excess_horizontal_space true
          }
        }
        label {text 'Age: '}
        label {
          text bind(@contact, :age, on_write: :to_i, computed_by: [:year_of_birth])
          layout_data {
            horizontal_alignment :fill
            grab_excess_horizontal_space true
          }
        }
      }
    }.open
  end
end

HelloComputed.new.launch
Glimmer app on the desktop (using glimmer-dsl-swt gem):

Glimmer app on the web (using glimmer-dsl-opal gem):
Start the Rails server:
rails s
Visit http://localhost:3000
You should see "Hello, Computed!"

Hello, List Single Selection!
Add the following require statement to app/assets/javascripts/application.rb
require 'glimmer-dsl-opal/samples/hello/hello_list_single_selection'
Or add the Glimmer code directly if you prefer to play around with it:
class Person
attr_accessor :country, :country_options
def initialize
self.=["", "Canada", "US", "Mexico"]
self.country = "Canada"
end
def reset_country
self.country = "Canada"
end
end
class HelloListSingleSelection
include Glimmer
def launch
person = Person.new
shell {
composite {
list {
selection bind(person, :country)
}
{
text "Reset"
do
person.reset_country
end
}
}
}.open
end
end
HelloListSingleSelection.new.launch
Glimmer app on the desktop (using glimmer-dsl-swt gem):

Glimmer app on the web (using glimmer-dsl-opal gem):
Start the Rails server:
rails s
Visit http://localhost:3000
You should see "Hello, List Single Selection!"

Hello, List Multi Selection!
Add the following require statement to app/assets/javascripts/application.rb
require 'glimmer-dsl-opal/samples/hello/hello_list_multi_selection'
Or add the Glimmer code directly if you prefer to play around with it:
class Person
attr_accessor :provinces, :provinces_options
def initialize
self.=[
"",
"Quebec",
"Ontario",
"Manitoba",
"Saskatchewan",
"Alberta",
"British Columbia",
"Nova Skotia",
"Newfoundland"
]
self.provinces = ["Quebec", "Manitoba", "Alberta"]
end
def reset_provinces
self.provinces = ["Quebec", "Manitoba", "Alberta"]
end
end
class HelloListMultiSelection
include Glimmer
def launch
person = Person.new
shell {
composite {
list(:multi) {
selection bind(person, :provinces)
}
{
text "Reset"
do
person.reset_provinces
end
}
}
}.open
end
end
HelloListMultiSelection.new.launch
Glimmer app on the desktop (using glimmer-dsl-swt gem):

Glimmer app on the web (using glimmer-dsl-opal gem):
Start the Rails server:
rails s
Visit http://localhost:3000
You should see "Hello, List Multi Selection!"

Hello, Browser!
Add the following require statement to app/assets/javascripts/application.rb
require 'glimmer-dsl-opal/samples/hello/hello_browser'
Or add the Glimmer code directly if you prefer to play around with it:
include Glimmer

shell {
  minimum_size 1024, 860
  browser {
    url 'http://brightonresort.com/about'
  }
}.open
Glimmer app on the desktop (using glimmer-dsl-swt gem):

Glimmer app on the web (using glimmer-dsl-opal gem):
Start the Rails server:
rails s
Visit http://localhost:3000
You should see "Hello, Browser!"

Hello, Tab!
Add the following require statement to app/assets/javascripts/application.rb
require 'glimmer-dsl-opal/samples/hello/hello_tab'
Or add the Glimmer code directly if you prefer to play around with it:
class HelloTab
  include Glimmer
  def launch
    shell {
      text "Hello, Tab!"
      tab_folder {
        tab_item {
          text "English"
          label {
            text "Hello, World!"
          }
        }
        tab_item {
          text "French"
          label {
            text "Bonjour, Univers!"
          }
        }
      }
    }.open
  end
end

HelloTab.new.launch
Glimmer app on the desktop (using glimmer-dsl-swt gem):


Glimmer app on the web (using glimmer-dsl-opal gem):
Start the Rails server:
rails s
Visit http://localhost:3000
You should see "Hello, Tab!"


Hello, Custom Widget!
Add the following require statement to app/assets/javascripts/application.rb
require 'glimmer-dsl-opal/samples/hello/hello_custom_widget'
Or add the Glimmer code directly if you prefer to play around with it:
# This class declares a `greeting_label` custom widget (by convention)
class GreetingLabel
include Glimmer::UI::CustomWidget
# multiple options without default values
:name, :colors
# single option with default value
option :greeting, default: 'Hello'
# internal attribute (not a custom widget option)
attr_accessor :color
before_body {
@font = {height: 24, style: :bold}
@color = :black
}
after_body {
return if colors.nil?
Thread.new {
colors.cycle { |color|
async_exec {
self.color = color
}
sleep(1)
}
}
}
body {
# pass received swt_style through to label to customize (e.g. :center to center text)
label(swt_style) {
text "#{greeting}, #{name}!"
font @font
foreground bind(self, :color)
}
}
end
# including Glimmer enables the Glimmer DSL syntax, including auto-discovery of the `greeting_label` custom widget
include Glimmer
shell {
fill_layout :vertical
minimum_size 215, 215
text 'Hello, Custom Widget!'
# custom widget options are passed in a hash
greeting_label(name: 'Sean')
# pass :center SWT style followed by custom widget options hash
greeting_label(:center, name: 'Laura', greeting: 'Aloha') #
greeting_label(:right, name: 'Rick') {
# you can nest attributes under custom widgets just like any standard widget
foreground :red
}
# the colors option cycles between colors for the label foreground every second
greeting_label(:center, name: 'Mary', greeting: 'Aloha', colors: [:red, :dark_green, :blue])
}.open
Glimmer app on the desktop (using glimmer-dsl-swt gem):

Glimmer app on the web (using glimmer-dsl-opal gem):
Start the Rails server:
rails s
Visit http://localhost:3000
You should see "Hello, Custom Widget!"

Hello, Custom Shell!
Add the following require statement to app/assets/javascripts/application.rb
require 'glimmer-dsl-opal/samples/hello/hello_custom_shell'
Or add the Glimmer code directly if you prefer to play around with it:
require 'date'
# This class declares an `email_shell` custom shell, aka custom window (by convention)
# Used to view an email message
class EmailShell
include Glimmer::UI::CustomShell
# multiple options without default values
:date, :subject, :from, :message
# single option with default value
option :to, default: '"John Irwin" <[email protected]>'
before_body {
@swt_style |= swt(:shell_trim, :modeless)
}
body {
# pass received swt_style through to shell to customize it (e.g. :dialog_trim for a blocking shell)
shell(swt_style) {
grid_layout(2, false)
text subject
label {
text 'Date:'
}
label {
text date
}
label {
text 'From:'
}
label {
text from
}
label {
text 'To:'
}
label {
text to
}
label {
text 'Subject:'
}
label {
text subject
}
label {
layout_data(:fill, :fill, true, true) {
horizontal_span 2 #TODO implement
vertical_indent 10
}
background :white
text
}
}
}
end
class HelloCustomShell
# including Glimmer enables the Glimmer DSL syntax, including auto-discovery of the `email_shell` custom widget
include Glimmer
Email = Struct.new(:date, :subject, :from, :message, keyword_init: true)
EmailSystem = Struct.new(:emails, keyword_init: true)
def initialize
@email_system = EmailSystem.new(
emails: [
Email.new(date: DateTime.new(2029, 10, 22, 11, 3, 0).strftime('%F %I:%M %p'), subject: '3rd Week Report', from: '"Dianne Tux" <[email protected]>', message: "Hello,\n\nI was wondering if you'd like to go over the weekly report sometime this afternoon.\n\nDianne"),
Email.new(date: DateTime.new(2029, 10, 21, 8, 1, 0).strftime('%F %I:%M %p'), subject: 'Glimmer Upgrade v100.0', from: '"Robert McGabbins" <[email protected]>', message: "Team,\n\nWe are upgrading to Glimmer version 100.0.\n\nEveryone pull the latest code!\n\nRegards,\n\nRobert McGabbins"),
Email.new(date: DateTime.new(2029, 10, 19, 16, 58, 0).strftime('%F %I:%M %p'), subject: 'Christmas Party', from: '"Lisa Ferreira" <[email protected]>', message: "Merry Christmas,\n\nAll office Christmas Party arrangements have been set\n\nMake sure to bring a Secret Santa gift\n\nBest regards,\n\nLisa Ferreira"),
Email.new(date: DateTime.new(2029, 10, 16, 9, 43, 0).strftime('%F %I:%M %p'), subject: 'Glimmer Upgrade v99.0', from: '"Robert McGabbins" <[email protected]>', message: "Team,\n\nWe are upgrading to Glimmer version 99.0.\n\nEveryone pull the latest code!\n\nRegards,\n\nRobert McGabbins"),
Email.new(date: DateTime.new(2029, 10, 15, 11, 2, 0).strftime('%F %I:%M %p'), subject: '2nd Week Report', from: '"Dianne Tux" <[email protected]>', message: "Hello,\n\nI was wondering if you'd like to go over the weekly report sometime this afternoon.\n\nDianne"),
Email.new(date: DateTime.new(2029, 10, 2, 10, 34, 0).strftime('%F %I:%M %p'), subject: 'Glimmer Upgrade v98.0', from: '"Robert McGabbins" <[email protected]>', message: "Team,\n\nWe are upgrading to Glimmer version 98.0.\n\nEveryone pull the latest code!\n\nRegards,\n\nRobert McGabbins"),
]
)
end
def launch
shell {
grid_layout
text 'Hello, Custom Shell!'
label {
font height: 24, style: :bold
text 'Emails:'
}
label {
font height: 18
text 'Click an email to view its message'
}
table {
layout_data :fill, :fill, true, true
table_column {
text 'Date:'
width 180
}
table_column {
text 'Subject:'
width 180
}
table_column {
text 'From:'
width 360
}
items bind(@email_system, :emails), column_properties(:date, :subject, :from)
on_mouse_up { |event|
email = event.table_item.get_data
Thread.new do
async_exec {
email_shell(date: email.date, subject: email.subject, from: email.from, message: email.).open
}
end
}
}
}.open
end
end
HelloCustomShell.new.launch
Glimmer app on the desktop (using glimmer-dsl-swt gem):


Glimmer app on the web (using glimmer-dsl-opal gem):
Start the Rails server:
rails s
Visit http://localhost:3000
You should see "Hello, Custom Widget!"


Elaborate Samples
Login
Add the following require statement to app/assets/javascripts/application.rb
require 'glimmer-dsl-opal/samples/elaborate/login'
Or add the Glimmer code directly if you prefer to play around with it:
require "observer"
#Presents login screen data
class LoginPresenter
attr_accessor :user_name
attr_accessor :password
attr_accessor :status
def initialize
@user_name = ""
@password = ""
@status = "Logged Out"
end
def status=(status)
@status = status
#TODO add feature to bind dependent properties to master property (2017-07-25 nested data binding)
notify_observers("logged_in")
notify_observers("logged_out")
end
def logged_in
self.status == "Logged In"
end
def logged_out
!self.logged_in
end
def login
self.status = "Logged In"
end
def logout
self.user_name = ""
self.password = ""
self.status = "Logged Out"
end
end
#Login screen
class Login
include Glimmer
def launch
presenter = LoginPresenter.new
@shell = shell {
text "Login"
composite {
grid_layout 2, false #two columns with differing widths
label { text "Username:" } # goes in column 1
text { # goes in column 2
text bind(presenter, :user_name)
enabled bind(presenter, :logged_out)
}
label { text "Password:" }
text(:password, :border) {
text bind(presenter, :password)
enabled bind(presenter, :logged_out)
}
label { text "Status:" }
label { text bind(presenter, :status) }
{
text "Login"
enabled bind(presenter, :logged_out)
{ presenter.login }
}
{
text "Logout"
enabled bind(presenter, :logged_in)
{ presenter.logout }
}
}
}
@shell.open
end
end
Login.new.launch
Glimmer app on the desktop (using glimmer-dsl-swt gem):


Glimmer app on the web (using glimmer-dsl-opal gem):
Start the Rails server:
rails s
Visit http://localhost:3000
You should see "Login" dialog


Tic Tac Toe
Add the following require statement to app/assets/javascripts/application.rb
require 'glimmer-dsl-opal/samples/elaborate/tic_tac_toe'
Or add the Glimmer code directly if you prefer to play around with it:
class TicTacToe
class Cell
EMPTY = ""
attr_accessor :sign, :empty
def initialize
reset
end
def mark(sign)
self.sign = sign
end
def reset
self.sign = EMPTY
end
def sign=(sign_symbol)
@sign = sign_symbol
self.empty = sign == EMPTY
end
def marked
!empty
end
end
end
class TicTacToe
class Board
DRAW = :draw
IN_PROGRESS = :in_progress
WIN = :win
attr :winning_sign
attr_accessor :game_status
def initialize
@sign_state_machine = {nil => "X", "X" => "O", "O" => "X"}
build_grid
@winning_sign = Cell::EMPTY
@game_status = IN_PROGRESS
end
#row and column numbers are 1-based
def mark(row, column)
self[row, column].mark(current_sign)
game_over? #updates winning sign
end
def current_sign
@current_sign = @sign_state_machine[@current_sign]
end
def [](row, column)
@grid[row-1][column-1]
end
def game_over?
win? or draw?
end
def win?
win = (row_win? or column_win? or diagonal_win?)
self.game_status=WIN if win
win
end
def reset
(1..3).each do |row|
(1..3).each do |column|
self[row, column].reset
end
end
@winning_sign = Cell::EMPTY
@current_sign = nil
self.game_status=IN_PROGRESS
end
private
def build_grid
@grid = []
3.times do |row_index| #0-based
@grid << []
3.times { @grid[row_index] << Cell.new }
end
end
def row_win?
(1..3).each do |row|
if row_has_same_sign(row)
@winning_sign = self[row, 1].sign
return true
end
end
false
end
def column_win?
(1..3).each do |column|
if column_has_same_sign(column)
@winning_sign = self[1, column].sign
return true
end
end
false
end
#needs refactoring if we ever decide to make the board size dynamic
def diagonal_win?
if (self[1, 1].sign == self[2, 2].sign) and (self[2, 2].sign == self[3, 3].sign) and self[1, 1].marked
@winning_sign = self[1, 1].sign
return true
end
if (self[3, 1].sign == self[2, 2].sign) and (self[2, 2].sign == self[1, 3].sign) and self[3, 1].marked
@winning_sign = self[3, 1].sign
return true
end
false
end
def draw?
@board_full = true
3.times do |x|
3.times do |y|
@board_full = false if self[x, y].empty
end
end
self.game_status = DRAW if @board_full
@board_full
end
def row_has_same_sign(number)
row_sign = self[number, 1].sign
[2, 3].each do |column|
return false unless row_sign == (self[number, column].sign)
end
true if self[number, 1].marked
end
def column_has_same_sign(number)
column_sign = self[1, number].sign
[2, 3].each do |row|
return false unless column_sign == (self[row, number].sign)
end
true if self[1, number].marked
end
end
end
class TicTacToe
include Glimmer
def initialize
@tic_tac_toe_board = Board.new
@shell = shell {
text "Tic-Tac-Toe"
composite {
grid_layout 3, true
(1..3).each { |row|
(1..3).each { |column|
{
layout_data :fill, :fill, true, true
text bind(@tic_tac_toe_board[row, column], :sign)
enabled bind(@tic_tac_toe_board[row, column], :empty)
{
@tic_tac_toe_board.mark(row, column)
}
}
}
}
}
}
observe(@tic_tac_toe_board, :game_status) { |game_status|
if game_status == Board::WIN
if game_status == Board::DRAW
}
end
def
("Player #{@tic_tac_toe_board.winning_sign} has won!")
end
def
("Draw!")
end
def ()
(@shell) {
text 'Game Over'
}.open
@tic_tac_toe_board.reset
end
def open
@shell.open
end
end
TicTacToe.new.open
Glimmer app on the desktop (using glimmer-dsl-swt gem):


Glimmer app on the web (using glimmer-dsl-opal gem):
Start the Rails server:
rails s
Visit http://localhost:3000
You should see "Tic Tac Toe"


Contact Manager
Add the following require statement to app/assets/javascripts/application.rb
require 'glimmer-dsl-opal/samples/elaborate/contact_manager'
Or add the Glimmer code directly if you prefer to play around with it:
class ContactManager
class Contact
attr_accessor :first_name, :last_name, :email
def initialize(attribute_map)
@first_name = attribute_map[:first_name]
@last_name = attribute_map[:last_name]
@email = attribute_map[:email]
end
end
end
class ContactManager
class ContactRepository
NAMES_FIRST = %w[
Liam
Noah
William
James
Oliver
Benjamin
Elijah
Lucas
Mason
Logan
Alexander
Ethan
Jacob
Michael
Daniel
Henry
Jackson
Sebastian
Aiden
Matthew
Samuel
David
Joseph
Carter
Owen
Wyatt
John
Jack
Luke
Jayden
Dylan
Grayson
Levi
Isaac
Gabriel
Julian
Mateo
Anthony
Jaxon
Lincoln
Joshua
Christopher
Andrew
Theodore
Caleb
Ryan
Asher
Nathan
Thomas
Leo
Isaiah
Charles
Josiah
Hudson
Christian
Hunter
Connor
Eli
Ezra
Aaron
Landon
Adrian
Jonathan
Nolan
Jeremiah
Easton
Elias
Colton
Cameron
Carson
Robert
Angel
Maverick
Nicholas
Dominic
Jaxson
Greyson
Adam
Ian
Austin
Santiago
Jordan
Cooper
Brayden
Roman
Evan
Ezekiel
Xaviar
Jose
Jace
Jameson
Leonardo
Axel
Everett
Kayden
Miles
Sawyer
Jason
Emma
Olivia
]
NAMES_LAST = %w[
Smith
Johnson
Williams
Brown
Jones
Miller
Davis
Wilson
Anderson
Taylor
]
def initialize(contacts = nil)
@contacts = contacts || 100.times.map do |n|
random_first_name_index = (rand*NAMES_FIRST.size).to_i
random_last_name_index = (rand*NAMES_LAST.size).to_i
first_name = NAMES_FIRST[random_first_name_index]
last_name = NAMES_LAST[random_last_name_index]
email = "#{first_name}@#{last_name}.com".downcase
Contact.new(
first_name: first_name,
last_name: last_name,
email: email
)
end
end
def find(attribute_filter_map)
@contacts.find_all do |contact|
match = true
attribute_filter_map.keys.each do |attribute_name|
contact_value = contact.send(attribute_name).downcase
filter_value = attribute_filter_map[attribute_name].downcase
match = false unless contact_value.match(filter_value)
end
match
end
end
end
end
class ContactManager
class ContactManagerPresenter
attr_accessor :results
@@contact_attributes = [:first_name, :last_name, :email]
@@contact_attributes.each {|attribute_name| attr_accessor attribute_name}
def initialize(contact_repository = nil)
@contact_repository = contact_repository || ContactRepository.new
@results = []
end
def list
self.results = @contact_repository.find({})
end
def find
filter_map = {}
@@contact_attributes.each do |attribute_name|
filter_map[attribute_name] = self.send(attribute_name) if self.send(attribute_name)
end
self.results = @contact_repository.find(filter_map)
@sort_attribute_name = nil
@sort_direction_ascending = nil
end
def toggle_sort(attribute_name)
@sort_attribute_name = attribute_name
@sort_direction_ascending = !@sort_direction_ascending
sorted_results = self.results.sort_by {|contact| contact.send(attribute_name).downcase}
sorted_results = sorted_results.reverse unless @sort_direction_ascending
self.results = sorted_results
end
end
end
class ContactManager
include Glimmer
def initialize
@contact_manager_presenter = ContactManagerPresenter.new
@contact_manager_presenter.list
end
def launch
shell {
text "Contact Manager"
composite {
composite {
grid_layout 2, false
label {text "First &Name: "}
text {
text bind(@contact_manager_presenter, :first_name)
on_key_pressed {|key_event|
@contact_manager_presenter.find if key_event.keyCode == Glimmer::SWT::SWTProxy[:cr]
}
}
label {text "&Last Name: "}
text {
text bind(@contact_manager_presenter, :last_name)
on_key_pressed {|key_event|
@contact_manager_presenter.find if key_event.keyCode == Glimmer::SWT::SWTProxy[:cr]
}
}
label {text "&Email: "}
text {
text bind(@contact_manager_presenter, :email)
on_key_pressed {|key_event|
@contact_manager_presenter.find if key_event.keyCode == Glimmer::SWT::SWTProxy[:cr]
}
}
composite {
grid_layout 2, false
{
text "&Find"
{
@contact_manager_presenter.find
}
}
{
text "&List All"
{
@contact_manager_presenter.list
}
}
}
}
table(:multi) { |table_proxy|
layout_data {
horizontal_alignment :fill
vertical_alignment :fill
grab_excess_horizontal_space true
grab_excess_vertical_space true
height_hint 200
}
table_column {
text "First Name"
width 80
{
@contact_manager_presenter.toggle_sort(:first_name)
}
}
table_column {
text "Last Name"
width 80
{
@contact_manager_presenter.toggle_sort(:last_name)
}
}
table_column {
text "Email"
width 200
{
@contact_manager_presenter.toggle_sort(:email)
}
}
items bind(@contact_manager_presenter, :results), column_properties(:first_name, :last_name, :email)
on_mouse_down { |event|
table_proxy.edit_table_item(event.table_item, event.column_index)
}
}
}
}.open
end
end
ContactManager.new.launch
Glimmer app on the desktop (using glimmer-dsl-swt gem):
Glimmer DSL for SWT Contact Manager

Glimmer DSL for SWT Contact Manager Find

Glimmer DSL for SWT Contact Manager Edit Started

Glimmer DSL for SWT Contact Manager Edit In Progress

Glimmer DSL for SWT Contact Manager Edit Done

Glimmer app on the web (using glimmer-dsl-opal gem):
Start the Rails server:
rails s
Visit http://localhost:3000
You should see "Tic Tac Toe"
Glimmer DSL for Opal Contact Manager

Glimmer DSL for Opal Contact Manager Find

Glimmer DSL for Opal Contact Manager Edit Started

Glimmer DSL for Opal Contact Manager Edit In Progress

Glimmer DSL for Opal Contact Manager Edit Done

External Samples
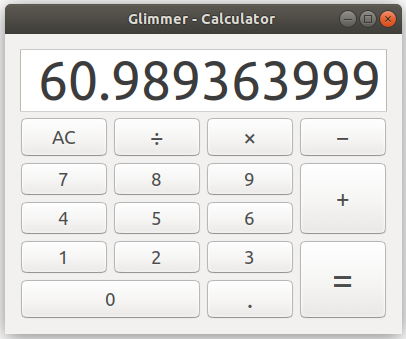
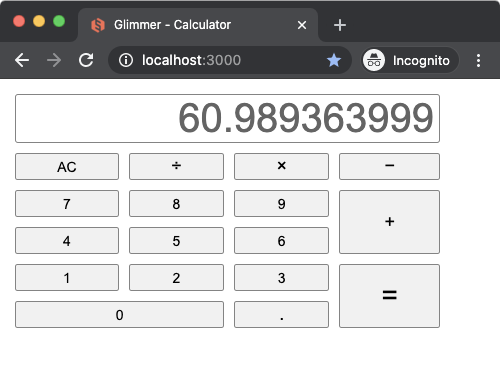
Glimmer Calculator
Add the glimmer-cs-calculator gem to Gemfile (without requiring):
gem 'glimmer-cs-calculator', require: false
Add the following require statement to app/assets/javascripts/application.rb
require 'glimmer-cs-calculator/launch'
Glimmer app on the desktop (using the glimmer-dsl-swt gem):
Glimmer app on the web (using glimmer-dsl-opal gem):
Start the Rails server:
rails s
Visit http://localhost:3000
You should see "Glimmer Calculator"
Help
Issues
You may submit issues on GitHub.
Click here to submit an issue.
Chat
If you need live help, try to
Feature Suggestions
These features have been suggested. You might see them in a future version of Glimmer. You are welcome to contribute more feature suggestions.
Change Log
Contributing
Contributors
- Andy Maleh (Founder)
Click here to view contributor commits.
License
Copyright (c) 2020 - Andy Maleh. See LICENSE.txt for further details.
--
![]() Built for Glimmer (Ruby Desktop Development GUI Library).
Built for Glimmer (Ruby Desktop Development GUI Library).