Gemika 
Test a Ruby gem against multiple versions of everything
Gemika helps you test your gem against multiple versions of Ruby, gem dependencies and database types.
Features
Here's what Gemika can give your test's development setup (all features are opt-in):
- Test one codebase against multiple sets of runtime gem dependency sets (e.g. Rails 2.3, Rails 5.0).
- Test one codebase against multiple Ruby versions (e.g. Ruby 1.8.7, Ruby 2.3.10).
- Test one codebase against multiple database types (currently MySQL, PostgreSQL, or sqlite3).
- Compute a matrix of all possible dependency permutations (Ruby, runtime gems, database type). Manually exclude incompatible dependency permutations (e.g. Rails 5.0 does not work with Ruby 2.1).
- Let developers enter their local credentials for MySQL and PostgreSQL in a
database.ymlfile. - Define default Ruby version, gem dependencies and database for developers who don't care about every possible permutation for everyday work.
- Help configure a Travis CI or Github Actions build that tests every dependency permutation after each
git push. - Share your Ruby / gem dependeny / database permutation between local development and Travis CI / Github Actions.
- Migrate your Travis CI config to a Github Actions config.
- Define an ActiveRecord database migration that sets up your test database.
- Automatically drop and re-create your test database before each run of your test suite.
- Work around breaking changes in RSpec, Ruby and other gems
Compatibility
Gemika currently supports the following dependency versions:
- Ruby: 2.3, 2.6, 3.0
- RSpec: Versions 1, 2, 3
- ActiveRecord: Versions 3.2, 4.2, 5.2, 6.1
- Databases: PostgreSQL (with
pggem), MySQL or MariaDB (withmysql2gem), or sqlite3 (withsqlite3gem)
Gemika also makes some assumption about your Gem:
- You're testing with RSpec.
- If you use any database-related features, you need
activerecordas a development dependency
Example directory structure
Below you can see the directory of a gem with a completed Gemika testing setup. The next section describes how to get there:
Gemfile.set1                                # First dependency set. Should include development dependencies and gemika.
Gemfile.set1.lock                           # Generated by `rake matrix:install`
Gemfile.set2                                # Second dependency set. Should include development dependencies and gemika.
Gemfile.set2.lock                           # Generated by `rake matrix:install`
Gemfile.set3                                # Third dependency set. Should include development dependencies and gemika.
Gemfile.set3.lock                           # Generated by `rake matrix:install`
Gemfile -> Gemfile.set2                     # Symlink to default Gemfile for development
Gemfile.lock -> Gemfile.set2.lock           # Symlink to default Gemfile.lock for development
.ruby-version                               # Default Ruby version for development
.gitignore                                  # Should ignore spec/support/database.yml
.travis.yml                                 # Configures all tested Ruby / gemfile combinations, for both local development and Travis CI
my_gem.gemspec                              # Specification for your gem
Rakefile                                    # Should require 'gemika/tasks'
README.md                                   # README for your gem
lib/my_gem.rb                               # Main file to require for your gem
lib/my_gem/my_class.rb                      # Class delivered by your gem
lib/my_gem/version.rb                       # Version definition for your gem
spec/spec_helper.rb                         # Requires 'gemika' and all files in support folder
spec/support/database.rb                    # Database schema for test database
spec/support/database.yml                   # Database credentials for local development (not checked in)
spec/support/database.sample.yml            # Sample database credentials for new developers
spec/support/database.travis.yml            # Database credentials for Travis CI
spec/support/database.github.yml            # Alternatively: Database credentials for Github Actions
spec/my_gem/my_class_spec.rb                # Tests for your gem
For a live example of this setup, check the makandra/minidusen repo.
Step-by-step integration
Have a standard gem setup
Gemika expects a standard gem directory that looks roughly like this:
my_gem.gemspec      # Specification for your gem
Rakefile            # Rake tasks for your gem
lib/my_gem.rb       # Main file to require for your gem
spec/my_gem_spec.rb # Tests for your gem
If you don't have a directory yet, you can ask Bundler to create it for you:
bundle gem my_gem
This will create a new directory named my_gem with your new gem skeleton.
Install Gemika
Switch to your favorite Ruby version and install the Gemika gem:
gem install gemika
Future contributors to your gem can install Gemika using the Gemfiles we will create below.
Rake tasks
Add this to your Rakefile to gain tasks matrix:install, matrix:spec, matrix:update.
begin
  require 'gemika/tasks'
rescue LoadError
  puts 'Run `gem install gemika` for additional tasks'
end
Check that the tasks appear with rake -T:
rake current_rspec[files]  # Run specs with the current RSpec version
rake matrix:install        # Install all Ruby 1.8.7 gemfiles
rake matrix:list           # List dependencies for all Ruby 1.8.7 gemfiles
rake matrix:spec[files]    # Run specs for all Ruby 1.8.7 gemfiles
rake matrix:update[gems]   # Update all Ruby 1.8.7 gemfiles
We also recommend to make matrix:spec the default task in your Rakefile:
task :default => 'matrix:spec'
Define multiple dependency sets
We are now creating one Gemfile for each set of gems and database type you'd like to test again.
Your gemfiles should be placed directly in your project's root directory.
For each dependency set, create a Gemfile in the project root directory that contains:
- The runtime dependencies you'd like to test against (e.g. Rails 5)
- The development dependencies for that set (e.g.
rspec) in a version that is compatible with these runtime dependencies. - The
gemikagem - Your own gem from path
.
For instance, if one dependency set is Rails 3.2 with a MySQL database, we would create ./Gemfile.4.2.mysql2 with these contents:
source 'https://rubygems.org'

# Runtime dependencies
gem 'rails', '~>3.2.22'
gem 'mysql2', '= 0.4.10'

# Development dependencies
gem 'rspec', '~> 3.4'
gem 'rake'
gem 'byebug'
gem 'gemika'

# Gem under test
gem 'my_gem', :path => '.'
If a second dependency is Rails 5.0 with a PostgreSQL database, we would create ./Gemfile.5.0.pg with these contents:
source 'https://rubygems.org'

# Runtime dependencies
gem 'rails', '~>5.0.0'
gem 'pg', '~>0.18.4'

# Development dependencies
gem 'rspec', '~>3.5'
gem 'rake'
gem 'byebug'
gem 'gemika'

# Gem under test
gem 'my_gem', :path => '.'
In this example, your project directory should now also contain:
Gemfile.4.2.mysql2
Gemfile.5.0.pg
Define combinations of gemfiles and Ruby versions
We will now define a test matrix that contains all permutations of gemfiles and tested Ruby versions.
We store the matrix in a .travis.yml file, even if the project is not using Travis CI. This allows us to configure the matrix once and us it for both local development and Travis CI builds.
Create a .travis.yml that lists all gemfiles and Ruby versions you'd like to test against:
rvm:
  - 2.1.8
  - 2.2.4
  - 2.3.1

gemfile:
  - Gemfile.3.2.mysql2
  - Gemfile.4.2.mysql2
  - Gemfile.4.2.pg
  - Gemfile.5.0.mysql2
  - Gemfile.5.0.pg
Don't mind the rvm key if you're using a different version manager locally (like rbenv). Things will still work.
Alternatively, create a Github Actions file like this.
Excluding incompatible matrix rows
There might be incompatible combinations of gemfiles and Rubies, e.g. Rails 5.0 does not work with Ruby 2.1 or lower. In this case, add an matrix/exclude key to your .travis.yml:
matrix:
  exclude:
    - gemfile: Gemfile.5.0.mysql2
      rvm: 2.1.8
    - gemfile: Gemfile.5.0.pg
      rvm: 2.1.8
For .github/workflows/test.yml, it looks similar:
jobs:
  my_job:
    strategy:
      matrix:
        exclude:
          - gemfile: Gemfile.5.0.mysql2
            ruby: 2.1.8
          - gemfile: Gemfile.5.0.pg
            ruby: 2.1.8
Alternatively, you can instead explicitly list all Ruby / Gemfile combinations with
matrix:
  include:
  - gemfile: Gemfile.5.0.mysql2
    rvm: 2.3.8
  - gemfile: Gemfile.5.2.mysql2
    rvm: 2.3.8
Generate lockfiles
Generate lockfiles for each bundle by running:
rake matrix:install
In this example, your project directory should now contain a lockfile for each gemfile:
Gemfile.4.2.mysql2
Gemfile.4.2.mysql2.lock
Gemfile.5.0.pg
Gemfile.5.0.pg.lock
Gemfiles and lockfiles should be committed to your repo.
Make sure to re-run rake matrix:install after each change to your gemfiles, and commit the generated changes.
Default Ruby and default gemfile
Your project will be more approachable if you're defining a default Ruby and dependency set. This way a developer can make changes and run code without knowing about the test matrix.
Create a .ruby-version file with the default Ruby version:
2.2.4
Choose a default dependency set and symlink both gemfile and lockfile to your project root:
ln -s Gemfile.4.2.mysql2 Gemfile
ln -s Gemfile.4.2.mysql2.lock Gemfile.lock
Commit both .ruby-version and symlinks to your repo.
We recommend to setup Travis CI (see below) to check the entire test matrix after each push, even if a developer only tested with the defaults.
Test databases
Create a local test database my_gem_test in either MySQL, PostgreSQL or both (depending on what you support). If you want to test against multiple database types, you should have created one gemfile for each type above.
Now create a file spec/support/database.yml that contains your local database credentials:
mysql:
  database: my_gem_test
  host: localhost
  username: root
  password: secret

postgresql:
  database: minidusen_test
  user:
  password:

sqlite:
  database: ":memory:"
We don't want to commit our local credentials, so add a line to your .gitignore:
spec/support/database.yml
What we will commit is a database.sample.yml as a template for future contributors:
cp spec/support/database.yml spec/support/database.sample.yml
Remember to replace any private passwords in database.sample.yml with secret before committing.
To have ActiveRecord connect to the database in database.yml before your tests, add a file spec/support/database.rb with the following content:
database = Gemika::Database.new
database.connect
Now require Gemika and this support file from your spec_helper.rb.
require 'gemika'
require 'spec/support/database'
Protip: Instead of requiring support files indidually, configure your spec_helper.rb to automatically require all files in the spec/support folder:
Dir["#{File.dirname(__FILE__)}/support/*.rb"].sort.each {|f| require f}
Now you have a great place for code snippets that need to run before specs (factories, VCR configuration, etc.).
To have your database work with Github Actions, add a database file spec/support/database.github.yml.
mysql:
  database: test
  username: root
  password: password
  host: 127.0.0.1
  port: 3306

postgresql:
  database: test
  host: localhost
  username: postgres
  password: postgres
  port: 5432
Test database schema
If your gem is talking to the database, you probably need to create some example tables.
Gemika lets you define an ActiveRecord database migration for that. Before your test suite runs, Gemika will drop all tables in your test database and recreate them using this migration.
Add your migration to your spec/support/database.rb (created and required above):
database = Gemika::Database.new
database.connect
database.rewrite_schema! do

  create_table :users do |t|
    t.string :name
    t.string :email
    t.string :city
  end

  create_table :recipes do |t|
    t.string :name
    t.integer :category_id
  end

  create_table :recipe_ingredients do |t|
    t.string :name
    t.integer :recipe_id
  end

  create_table :recipe_categories do |t|
    t.string :name
  end

end
Clean database before each test
A very useful Rails default is to wrap every test in a transaction that is rolled back when the example ends. This way each example starts with a blank database.
To get the same behavior in your gem tests, add database_cleaner as a development dependency to all your gemfiles:
gem 'database_cleaner'
If you don't want to configure database_cleaner manually, you can ask Gemika to clean the database before each example:
Gemika::RSpec.configure_clean_database_before_example
Note that you also need require 'gemika' in your spec_helper.rb.
Migrate from Travis CI to Github Actions
To help in your migrations, you can ask Gemika to generate a Github Actions config from an existing .travis-ci.yml.
To do this, call
bundle exec rake gemika:generate_github_actions_workflow
Copy the resulting file to .github/workflows/test.yml.
Make sure you have a spec/support/database.github.yml if you use databases. See above how this is supposed to look like.
You may have to fix a few things manually though. For example, Github Actions will only allow certain Ruby versions (but show you a list of supported versions when it fails).
Also, when you run on a Ubuntu 20.04 container, you might have issues with the mysql2 gem. See this guide for a potential solution.
Try it out
Check if you can install development dependencies for each row in the test matrix:
bundle exec rake matrix:install
Check if you can run tests for each row in the test matrix:
bundle exec rake matrix:spec
To only run some examples, put the list of files in square brackets (it's a Rake thing):
bundle exec rake matrix:spec[spec/foo_spec.rb:1005]
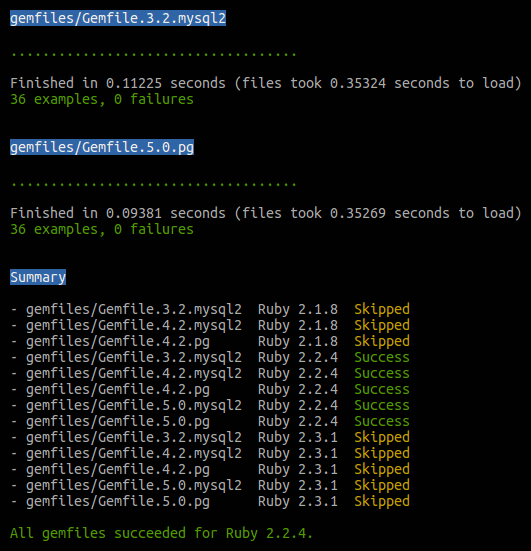
You should see the command output for each row in the test matrix. Gemika will also print a summary at the end:
If you now discover compatibility issue with your library, see below how Gemika can help you bridge incompatibilities between dependency sets.
Running specs in multiple Ruby versions
Note that there is no task for automatically running all gemfiles in all Ruby versions. We had something like this in earlier versions of Gemika and it wasn't as practical as we thought.
Instead you need to manually switch Ruby versions and re-run:
rake matrix:install
rake matrix:spec
Note that if your current Ruby version is very far away from your default Ruby in .ruby-version, you might need to run rake with a gemfile that has compatible dependencies:
BUNDLE_GEMFILE=Gemfile.2.3 bundle exec rake matrix:install
BUNDLE_GEMFILE=Gemfile.2.3 bundle exec rake matrix:spec
We recommend to setup Travis CI to check the entire test matrix after each push, including all Rubies. This way developers can stay on the default Ruby and gemfile most of the time while Travis CI checks make sure that nothing broken gets merged.
Activate Travis CI
We recommend to setup Travis CI to check the entire test matrix after each push. Travis CI will also show the build results on Github's pull request page, helping maintainers decide whether a PR is safe to merge.
If you plan to use Travis CI, also add a spec/support/database.travis.yml with Travis' default database credentials:
mysql:
  database: my_gem_test
  username: travis
  password:

postgresql:
  database: my_gem_test
  user: postgres
  password:
Add options to .travis.yml to create databases before running tests:
before_script:
  - psql -c 'create database mygem_test;' -U postgres
  - mysql -e 'create database IF NOT EXISTS mygem_test;'
Also add the other .travis.yml settings required for a Ruby project:
language: ruby

sudo: false

cache: bundler

notifications:
  email:
    - [email protected]

install:
  # Replace default Travis CI bundler script with a version that doesn't
  # explode when lockfile doesn't match recently bumped version
  - bundle install --no-deployment --jobs=3 --retry=3 --path=${BUNDLE_PATH:-vendor/bundle}

script: bundle exec rake current_rspec
Adjust the script option if you're not using RSpec to test your code.
Activate Github integration
To activate Travis CI for your Github repo:
- Log into Github
- Open your gem's project page
- Open Settings
- Navigate to Integrations & services
- Open the Add service dropdown
- Select Travis CI
- Authenticate via OAuth
To check if the integration has worked, push a change and check if you can see your build matrix on the Travis CI dashboard.
Build badge
You might want to a build status badge to your README.md like this:

You can add such a badge using this markdown:
[](https://travis-ci.org/my_org/my_gem)
Protect the master branch
If you're super paranoid you can also prevent anyone from pushing to master without a green Travis CI build:
- Open your Github project settings
- Navigate to Branches
- Below Protected branches, open the Choose a branch... dropdown
- Select
master - Check Protect this branch
- Check Require status checks to pass before merging
- Check the status check
continuous-integration/travis-ci - Press Save changes
Add development instructions to your README
Your README should contain instructions how to run tests before making a PR. We recommend to add a section like the one below to your README.md:
## Development

There are tests in `spec`. We only accept PRs with tests. To run tests:

- Install Ruby x.y.z
- Create a local test database `my_gem_test` in both MySQL and PostgreSQL
- Copy `spec/support/database.sample.yml` to `spec/support/database.yml` and enter your local credentials for the test databases
- Install development dependencies using `bundle install`
- Run tests using `bundle exec rspec`

We recommend to test large changes against multiple versions of Ruby and multiple dependency sets. Supported combinations are configured in `.travis.yml`. We provide some rake tasks to help with this:

- Install development dependencies using `bundle matrix:install`
- Run tests using `bundle matrix:spec`

Note that we have configured Travis CI to automatically run tests in all supported Ruby versions and dependency sets after each push. We will only merge pull requests after a green Travis build.
Adjust the first part to match what you chose as your default Ruby and default gemfile.
Bridging incompatibilities between dependency sets
Gemika can help you bridge incompatibilities or breaking changes between Ruby versions, gem versions, or RSpec.
Version switches
Check if a gem was activated by the current gemfile:
Gemika::Env.gem?('activesupport')
Check if a gem was activated and satisfies a version requirement:
Gemika::Env.gem?('activesupport', '>= 5')
Gemika::Env.gem?('activesupport', '~> 5.0.0')
Gemika::Env.gem?('activesupport', '< 5')
Check if the current Ruby version satisfies a version requirement:
Gemika::Env.ruby?('>= 2')
Gemika::Env.ruby?('< 2')
Gemika::Env.ruby?('~> 2.1.0')
Check if the process is running as a Travis CI build:
Gemika::Env.travis?
RSpec 1 vs. RSpec 2+
If you're testing gems against Rails 2.3 or Ruby 1.8.7 you might need to test with RSpec 1. There are a lot of differences between RSpec 1 and later versions, which Gemika helps to pave over.
Configuring RSpec requires you to work on a different module in RSpec 1 (Spec::Runner) and RSpec 2 (just RSpec). The following works for all RSpec versions:
Gemika::RSpec.configure do |config|

  config.before(:each) do
    # runs before each example
  end

end
When your tests need to run with RSpec 1, you need to use the old should syntax, which works across all RSpec versions.
To enable this should syntax for later RSpecs:
Gemika::RSpec.configure_should_syntax
RSpec 1 has a binary spec, while later RSpecs use rspec. To call the correct binary for the current gemfile:
rake current_rspec
Development
Here are some hints when you try to make changes to Gemika itself:
There are tests in spec. We only accept PRs with tests. To run tests:
- Install Ruby 2.6.4
- Create a local test database
gemika_testin both MySQL and PostgreSQL - Copy
spec/support/database.sample.ymltospec/support/database.ymland enter your local credentials for the test databases - Create the databases specified in
database.yml - Install development dependencies using
bundle install - Run tests using
bundle exec rspec
We recommend to test large changes against multiple versions of Ruby and multiple dependency sets. Supported combinations are configured in .travis.yml. We provide some rake tasks to help with this:
- Install development dependencies using
bundle matrix:install - Run tests using
bundle matrix:spec
Note that we have configured Travis CI to automatically run tests in all supported Ruby versions and dependency sets after each push. We will only merge pull requests after a green Travis build.
Credits
Henning Koch from makandra