GEM IS UNDER CONSNSTRUCTION!
Please Mail me if any - '[email protected]'
CCBill SDK for Ruby
Unofficial CCBill SDK for Ruby.
This gem provides:
- Easy Install
- Getting started guide
- Generator that creates
- Approve/Deny callback paths
- Background Post path
- Url/Form Generator for test and live mode
Getting started
gem 'ccbill_ruby'
Then run bundle install
Next, you need to run the generator:
$ rails generate ccbill:install
This will create a controller (if one does not exist) and configure it with the default actions. The generator also configures your config/routes.rb file to point to the CCBill controller.
Example of usage:
form = Ccbill::DynamicPricing.new({
  initial_price_in_cents: 355
  initial_period: 30,
  order_id: 'Any configuration information'
})

form.valid?    #=> True/False
form.url       #=> URL
Controller and methods:
Before reading this part - please read Setup guide
rails generate ccbill:install will generate next:
  # config/routes.rb
  namespace :callbacks do
    resource :ccbill, only: [:show, :create]
  end
  # config/initializers/ccbill.rb
  CCBill.configure do |config|
    config.mode = :test
    config.salt = 'Encryption Key'
    config.default_currency = '840' # USD
    config.account = 'account_id'
    config.sub_account = '0000'
    config.flexform_id = 'flexform_id'
  end
  # app/controllers/callbacks/ccbills_controller.rb
  module Callbacks
    class CcbillsController < ApplicationController
      # before_action :check_ccbill_callback, only: :create

      # GET: Redirect from payment system after approval/deny.
      def show
        case response_params[:mppResponse]
        when 'CheckoutSuccess'
          flash[:notice] = "Payment was successfully paid"
        when 'CheckoutFail'
          flash[:alert] = "Payment was declined. We're sorry"
        else
          fail 'Unknown mmpResponse'
        end

        redirect_to root_url
      end

      # POST: Post Back
      def create
        postback = CCBill::Postback.new(response_params)

        if postback.approval?
          # Do something "Approval" postback.
        else
          # Do something "Deny" postback.
        end

        head :no_content
      end

      private

      def response_params
        @response_params ||= params.except(:controller, :action).to_unsafe_h
      end
    end
  end
Payment Flow
TODO: Video or Etc... TODO: NGrok. TODO: User should be logged in in the admin panel. TODO: Deny redirect happens only after three attempt.
The payment form is the CCBill form that will be displayed to customers after they choose to check out using CCBill. The payment form accepts customer payment information, processes the payment, and returns the customer to your Site through callbacks ( GET ) where you can catche the response and do proper redirect:
  callbacks_ccbill GET    /callbacks/ccbill(.:format)  callbacks/ccbills#show
                   POST   /callbacks/ccbill(.:format)  callbacks/ccbills#create
Important! CCBill provides two types of payment forms. FlexForms is our newest (and recommended) system. In this gem we use ONLY FlexForms.
!!! https://kb.ccbill.com/How+do+I+set+up+a+user+to+process+test+transactions
!!! All prices must be between $2.95 and $100.
!!! CVV only metters!
Setup guide
Instructions:
In order to set up a CCBill payment method, a CCBill Merchant account needs to be created.
Main Account
All CCBill clients have an account number for tracking purposes. The standard format is 9xxxxx-xxxx, where 6-digit number (9xxxxx) is the main account.
You can retrieve your main account number at the top bar near Client Account section.
Please enter the main account number to Main Account field.
Sub Account
After sign up for a website billing, you will be able to create a subaccount. The subaccount is a 4-digit number (xxxx) which is a part of main account.
To create a subaccount, go to Account Info menu item / Sub Account Admin section / Create Subaccount. After follow the instructions provided by CCBill to complete the subaccount.
Secret Key
You may obtain Salt value in 2 different ways:
- Contact CCBill Client Support and receive Salt value.
- You may create your own Salt value and provide it to CCBill Client Support.
Please note that Salt value is an alphanumeric string up to 32 characters long.
Form Secret Key ( flexform_id ):
In you CCBill Merchant Area you will be available to choose one of the CCBill Global Forms.
To retrieve one, go to Flexform System / FlexForm Payment Links. After click on Forms Library. Here will be displayed all forms that already in use (If you see nothing - that means you should create at least one Payment Flow )
After select an appropriate form you can customize it and preview it. ( How to customize form look into FAQ of the CCBill )
Callbacks URLs:
Success and Failure callback URLs need to be set up.
This urls you can setup at:
- click Account Info
- click Sub Account Admin
- select Any subaccount
- click Advansed section
- Set Approval Post URL and Denial Post URL
For local machine ( development env ) I use Ngrok to set valid path.
Important! You gotta be logged in to the CCBill admin to be able to see your forms in the sandbox.
Configure your CCBill Account:
The following CCBill settings must be correct for the payment module to work correctly.
Dynamic Pricing
Please work with your CCBill support representative to activate Dynamic Pricing for your account ( sub-account ). You can verify that Dynamic Pricing is active at Account Info > Manage the subaccount menu > Pick 0000 subaccount from select menu > Feature Summary at the bottom. in the Admin Portal. Your Dynamic Pricing status appears at the bottom of the Billing Tools section.
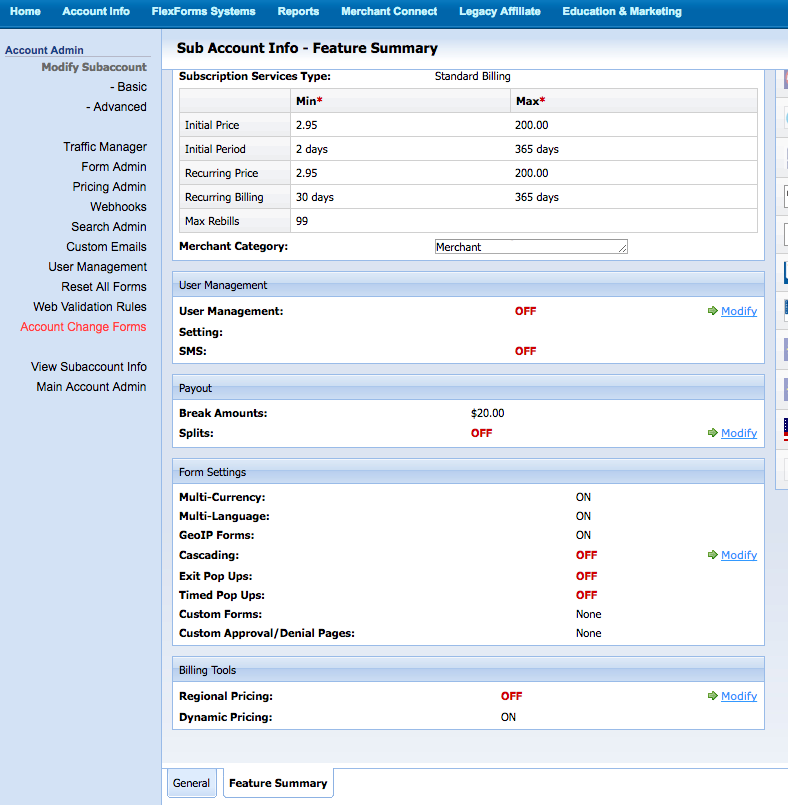
Please note that if Dynamic Pricing is enabled on the subaccount level, ALL signup forms on that subaccount must use Dynamic Pricing in order to function correctly. This includes forms created on the subaccount prior to Dynamic Pricing being enabled. If Dynamic Pricing is enabled only on a particular form and not the entire subaccount, other forms on that subaccount will not be required to use Dynamic Pricing.

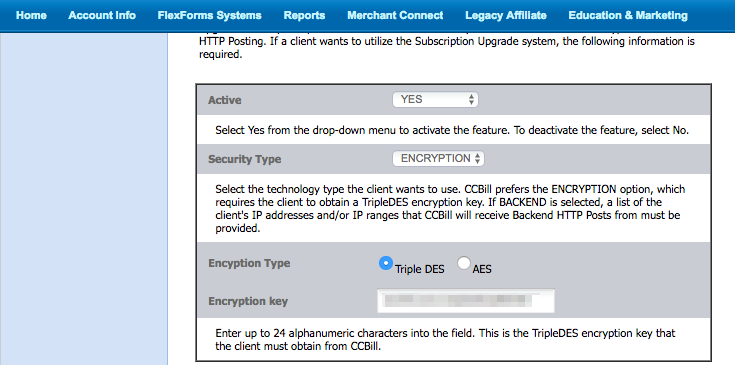
Creating a Salt / Encryption Key
A "salt" is a string of random data used to make your encryption more secure. Sub Account Admin > Advanced. It will appear in the Encryption Key field of the Upgrade Security Setup Information section.
Make note of the Salt: this value will be entered into the your configuration file. ( config/initializers/ccbill.rb )
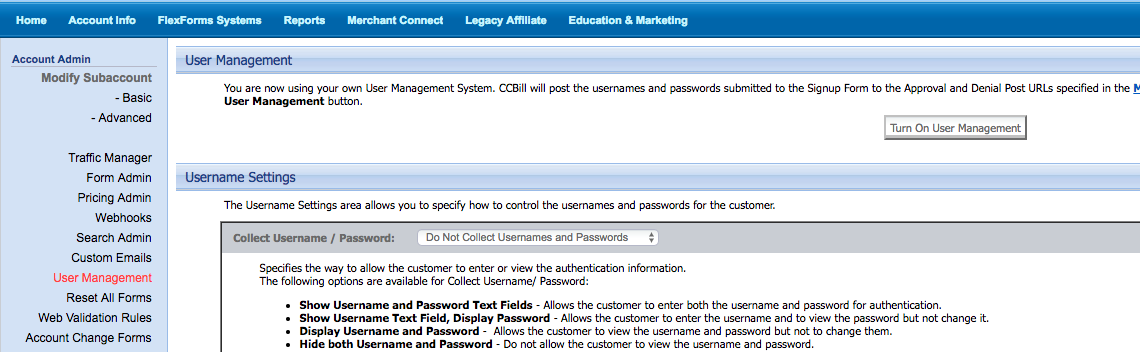
Disabling User Management
Since this sub-account will be used for Dynamic Pricing transactions (not managing user subscriptions), User Management must be disabled.
- Sign in to the Admin Portal.
- On the Account Info megamenu, click Sub Account Admin, then User Management on the left menu.
- Select Turn off User Management in the top section.
- Select Do Not Collect Usernames and Passwords in the Username Settings section.
Creating a New FlexForms Payment Form
Here is standart Getting Started with Flex Froms.
Visit FlexForms:
- Ensure All is selected in the top Client Account drop-down menu. FlexForms are not specific to sub accounts, and cannot be managed when a sub account is selected.
- Navigate to the FlexForms Systems tab in the top menu bar and select FlexForms Payment Links. All existing forms will be displayed in a table.
- Make sure that you in sendbox ( Top left corner )
Create an Approval URL
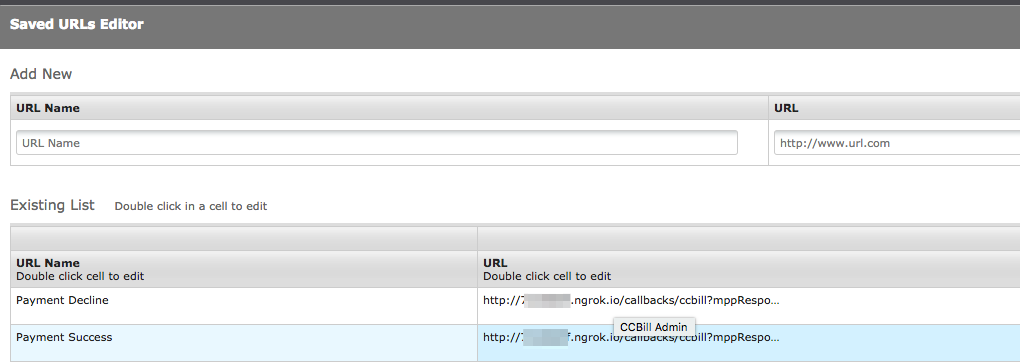
- Click the URLs Library button in the upper-right to create a new URL. The Saved URLs Editor dialog displays.
- Create Payment Success URL
- Use the fields under Add New to create a new URL with the following properties.
- URL Name. Enter a meaningful name for this URL. Forexample: Payment Success
- URL. Under URL, enter the base URL for your Site store. Forexample:
http://[SiteHost or Ngrok]/callbacks/ccbill?mppResponse=CheckoutSuccess
- Create Payment Decline URL. Forexample:
http://[SiteHost or Ngrok]/callbacks/ccbill?mppResponse=CheckoutFail - Click Save to commit your changes.
Important:
- Do not create alot of flex-form. You can't delete them!
- This is URLS ( GET ) where user will be redirected after success/deny payment.
- We set
mppResponse=CheckoutSuccessandmppResponse=CheckoutFailbecause we use this attribute atcallbacks/ccbills#showaction.
Create a New FlexForm
- Click the `Add New** button in the upper-left to create a new form.
- The A New Form dialog is displayed:
- Payment Flow Name. At the top, enter a name for the new payment flow (this will be different than the form name, as a single form can be used in multiple flows). Forexample: 'Dev Form'
- Form Name. Under Form Name, enter a name for the form. Forexample: '001ff'
- Dynamic Pricing. Under Pricing, check the box to enable dynamic pricing.
- Layout. Select your desired layout
- Save the form
- Edit the Flow
- Approval redirect to the Site
- Click the arrow button to the left of your new flow to view the details. ( Screenshot below )
- Under the green Approve arrow, click the square to modify the action.
- Approval URL. In the left menu, select A URL. Select Select a Saved URL and select the URL your created earlier (e.g. Payment Success).
- Redirect Time. Select a redirect time of 1 second using the slider at the bottom and save the form. ( e.g. 4 seconds )
- Deny redirect to the Site
- Under the red Deny arrow, click the square to modify the action.
- Approval URL. In the left menu, select A URL. Select **Select a Saved URL and select the URL your created earlier (e.g. Payment Decline`).
- Redirect Time. Select a redirect time of 1 second using the slider at the bottom and save the form. ( e.g. 7 seconds )
- Flex ID. Make note of the Flex ID: this value will be entered into the your configuration file. (
config/initializers/ccbill.rb)
Background Post
While still in the Sub Account Admin section, select Advanced from the left menu. Notice the top section titled Background Post Information. We will be modifying the Approval Post URL and Denial Post URL fields.
| Path | URL |
|---|---|
| Approval Post URL | http://[SiteHost or Ngrok]/callbacks/ccbill |
| Denial Post URL | http://[SiteHost or Ngrok]/callbacks/ccbill |
CCBill calls this URL in background.
Note: That will be POST request. In our case It will call callbacks/ccbills#create action. In this action based on patams we will find-out what request was called.

Your CCBill account is now configured
Go To LIVE:
TODO:
The LINKS that you get from the Sandbox Mode page are different from the links that you get from the Live Mode page
Please read next:
Useful Links:
- Dynamic Pricing
- FlexForm FAQs
- FlexForms Quick Start Guide
- FlexForms Sandbox
- FlexForms Form Status and Live Mode
- Test Transactions and Credit Cards
License
The gem is available as open source under the terms of the MIT License.