Bwoken 
Runs your UIAutomation tests from the command line for both iPhone and iPad, in the simulator or on your device.
Supports coffeescript and javascript.
Usage
Running tests
Make sure bwoken is properly installed. Then, build your project and run all your tests via:
# will build and run all of your tests
$ rake

# will run one file, relative to integration/coffeescript (note: no file extension)
$ RUN=iphone/focused_test rake
Simulator or Device?
To run bwoken tests on your device, just plug it in! And if you want to run tests in the simulator, just unplug it!
As of bwoken 1.2.0, you can pass SIMULATOR=true as an environment variable to force simulator use even if your device is plugged in:
# without a device connected, will run on the simulator:
$ rake

# with a device connected, will run on the device:
$ rake

# with a device connected, will run on the simulator:
$ SIMULATOR=true rake
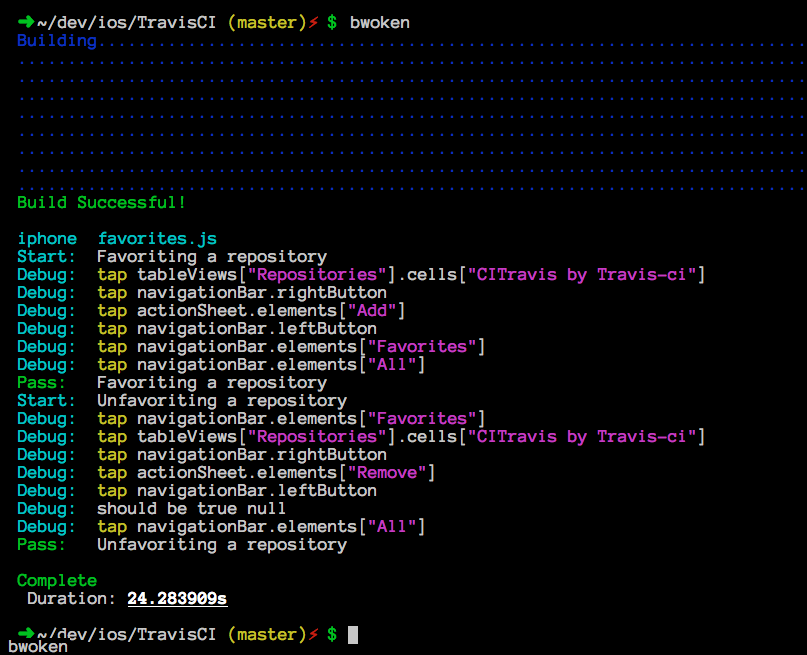
Your tests will look something like this:
$ rake
Building.............................................................................
.....................................................................................
.....................................................................................
.....................................................................................
.....................................................................................
.....................................................................................
.....................................................................................
................................................................................
Build Successful!

iphone  favorites.js
Start:  Favoriting a repository
Debug:  tap tableViews["Repositories"].cells["CITravis by Travis-ci"]
Debug:  tap navigationBar.rightButton
Debug:  tap actionSheet.elements["Add"]
Debug:  tap navigationBar.leftButton
Debug:  tap navigationBar.elements["Favorites"]
Debug:  navigationBar.elements["Favorites"].scrollToVisible
Debug:  tap navigationBar.elements["All"]
Pass:   Favoriting a repository
Start:  Unfavoriting a repository
Debug:  tap navigationBar.elements["Favorites"]
Debug:  tap tableViews["Repositories"].cells["CITravis by Travis-ci"]
Debug:  tap navigationBar.rightButton
Debug:  tap actionSheet.elements["Remove"]
Debug:  tap navigationBar.leftButton
Debug:  should be true null
Debug:  tap navigationBar.elements["All"]
Pass:   Unfavoriting a repository

Complete
 Duration: 23.419741s
Bring in Libraries!
Wanna bring in tuneup.js or mechanic? Just use #github instead of #import:
#github "alexvollmer/tuneup_js/tuneup.js"
#github "jaykz52/mechanic/src/mechanic-core.js"
Like Javascript?
Sometimes we'd like to have some javascript help us out. For example, what if you'd like Underscore.js in your test suite? Simple! Just put it in integration/javascript and import it in your test:
#import "../underscore.js"
Installation
Create an iOS project
If you don't have an iOS project already, go ahead and create it. If you already have a project, no worries: you can install bwoken at any point.
Ensure your project is in a workspace rather than simply a project:
- In Xcode, select File -> Save as workspace...
- Save the workspace in the same directory as your .xcodeproj file
Note: This is done automatically if you use CocoaPods. I highly suggest you do!
Prerequisites
Ensure Xcode is up-to-date.
Install rvm via the instructions. Ensure your after_cd_bundler rvm hook is enabled:
$ chmod u+x ~/.rvm/hooks/after_cd_bundler
Installation
In the terminal, inside the directory of your project (e.g., you should see a ProjectName.xcodeproj file), create an .rvmrc file and trigger its use:
$ echo 'rvm use 1.9.3@my_project' > .rvmrc
$ rvm rvmrc trust .rvmrc
$ . .rvmrc
Install bundler (a ruby library dependency manager) and init:
$ gem install bundler
$ bundle init
This will create a Gemfile. Add bwoken to it and bundle:
$ echo "gem 'bwoken'" >> Gemfile
$ bundle
Then, create a simple Rakefile and initialize your bwoken file structure:
$ echo "require 'bwoken/tasks'" > Rakefile
$ rake bwoken:init
Now, you can start using it!
Contributing
- Fork it
- Create your feature branch (
git checkout -b my-new-feature) - Commit your changes (
git commit -am 'Added some feature') - Push to the branch (
git push origin my-new-feature) - Create new Pull Request