ActivityNotification

![]()


![]()

![]()
activity_notification provides integrated user activity notifications for Ruby on Rails. You can easily use it to configure multiple notification targets and make activity notifications with notifiable models, like adding comments, responding etc.
activity_notification supports Rails 4.2+ with ActiveRecord, Mongoid and Dynamoid ORM. It is tested for MySQL, PostgreSQL, SQLite3 with ActiveRecord, MongoDB with Mongoid and Amazon DynamoDB with Dynamoid. The latest activity_notification v2 is almost compatible with v1.
About
activity_notification provides following functions:
- Notification API (creating notifications, query for notifications and managing notification parameters)
- Notification models (stored with ActiveRecord, Mongoid or Dynamoid ORM)
- Notification controllers (managing open/unopen of notifications, providing link to notifiable activity page)
- Notification views (presentation of notifications)
- Automatic tracked notifications (generating notifications along with the lifecycle of notifiable models)
- Grouping notifications (grouping like "Kevin and 7 other users posted comments to this article")
- Email notification
- Batch email notification (event driven or periodical email notification, daily or weekly etc)
- Push notification with Action Cable
- Subscription management (subscribing and unsubscribing for each target and notification type)
- Integration with Devise authentication
- Activity notifications stream integrated into cloud computing using Amazon DynamoDB Streams
- Optional notification targets (Configurable optional notification targets like Amazon SNS, Slack, SMS and so on)
Online demo
You can see an actual application using this gem here: https://activity-notification-example.herokuapp.com/
Login as the following test users to experience user activity notifications:
| Password | Admin? | |
|---|---|---|
| [email protected] | changeit | Yes |
| [email protected] | changeit | |
| [email protected] | changeit | |
| [email protected] | changeit |
The deployed demo application is included in this gem's source code as a test application here: /spec/rails_app
Notification index and plugin notifications
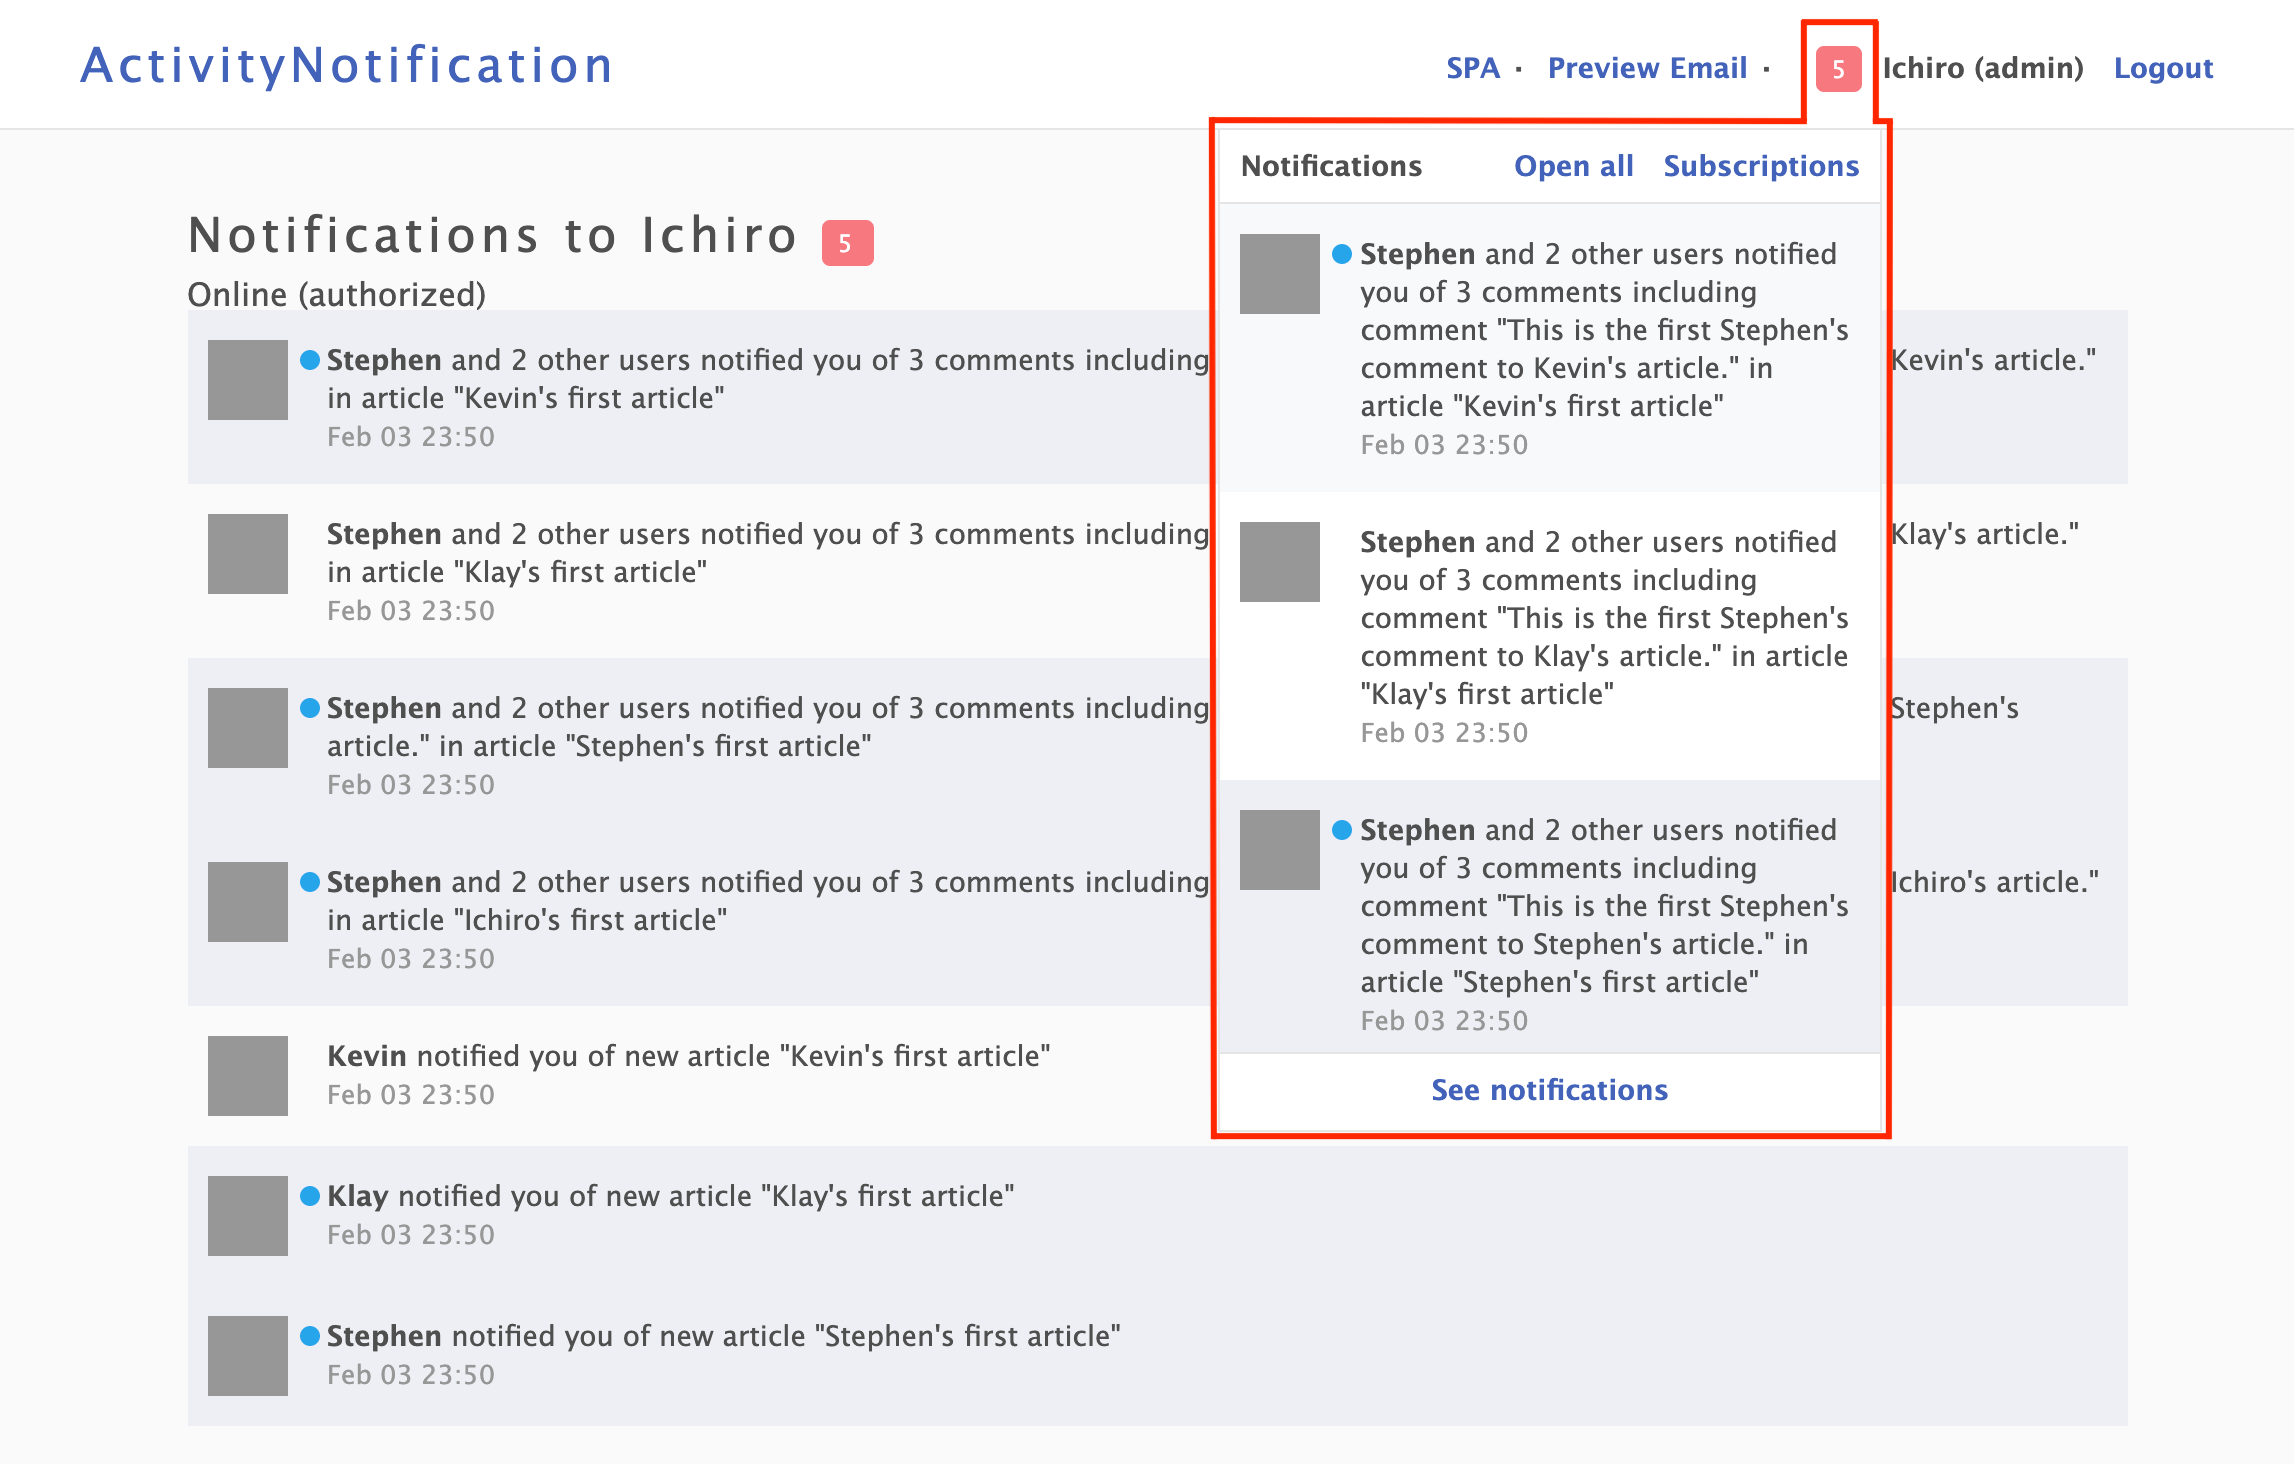
activity_notification deeply uses PublicActivity as reference in presentation layer.
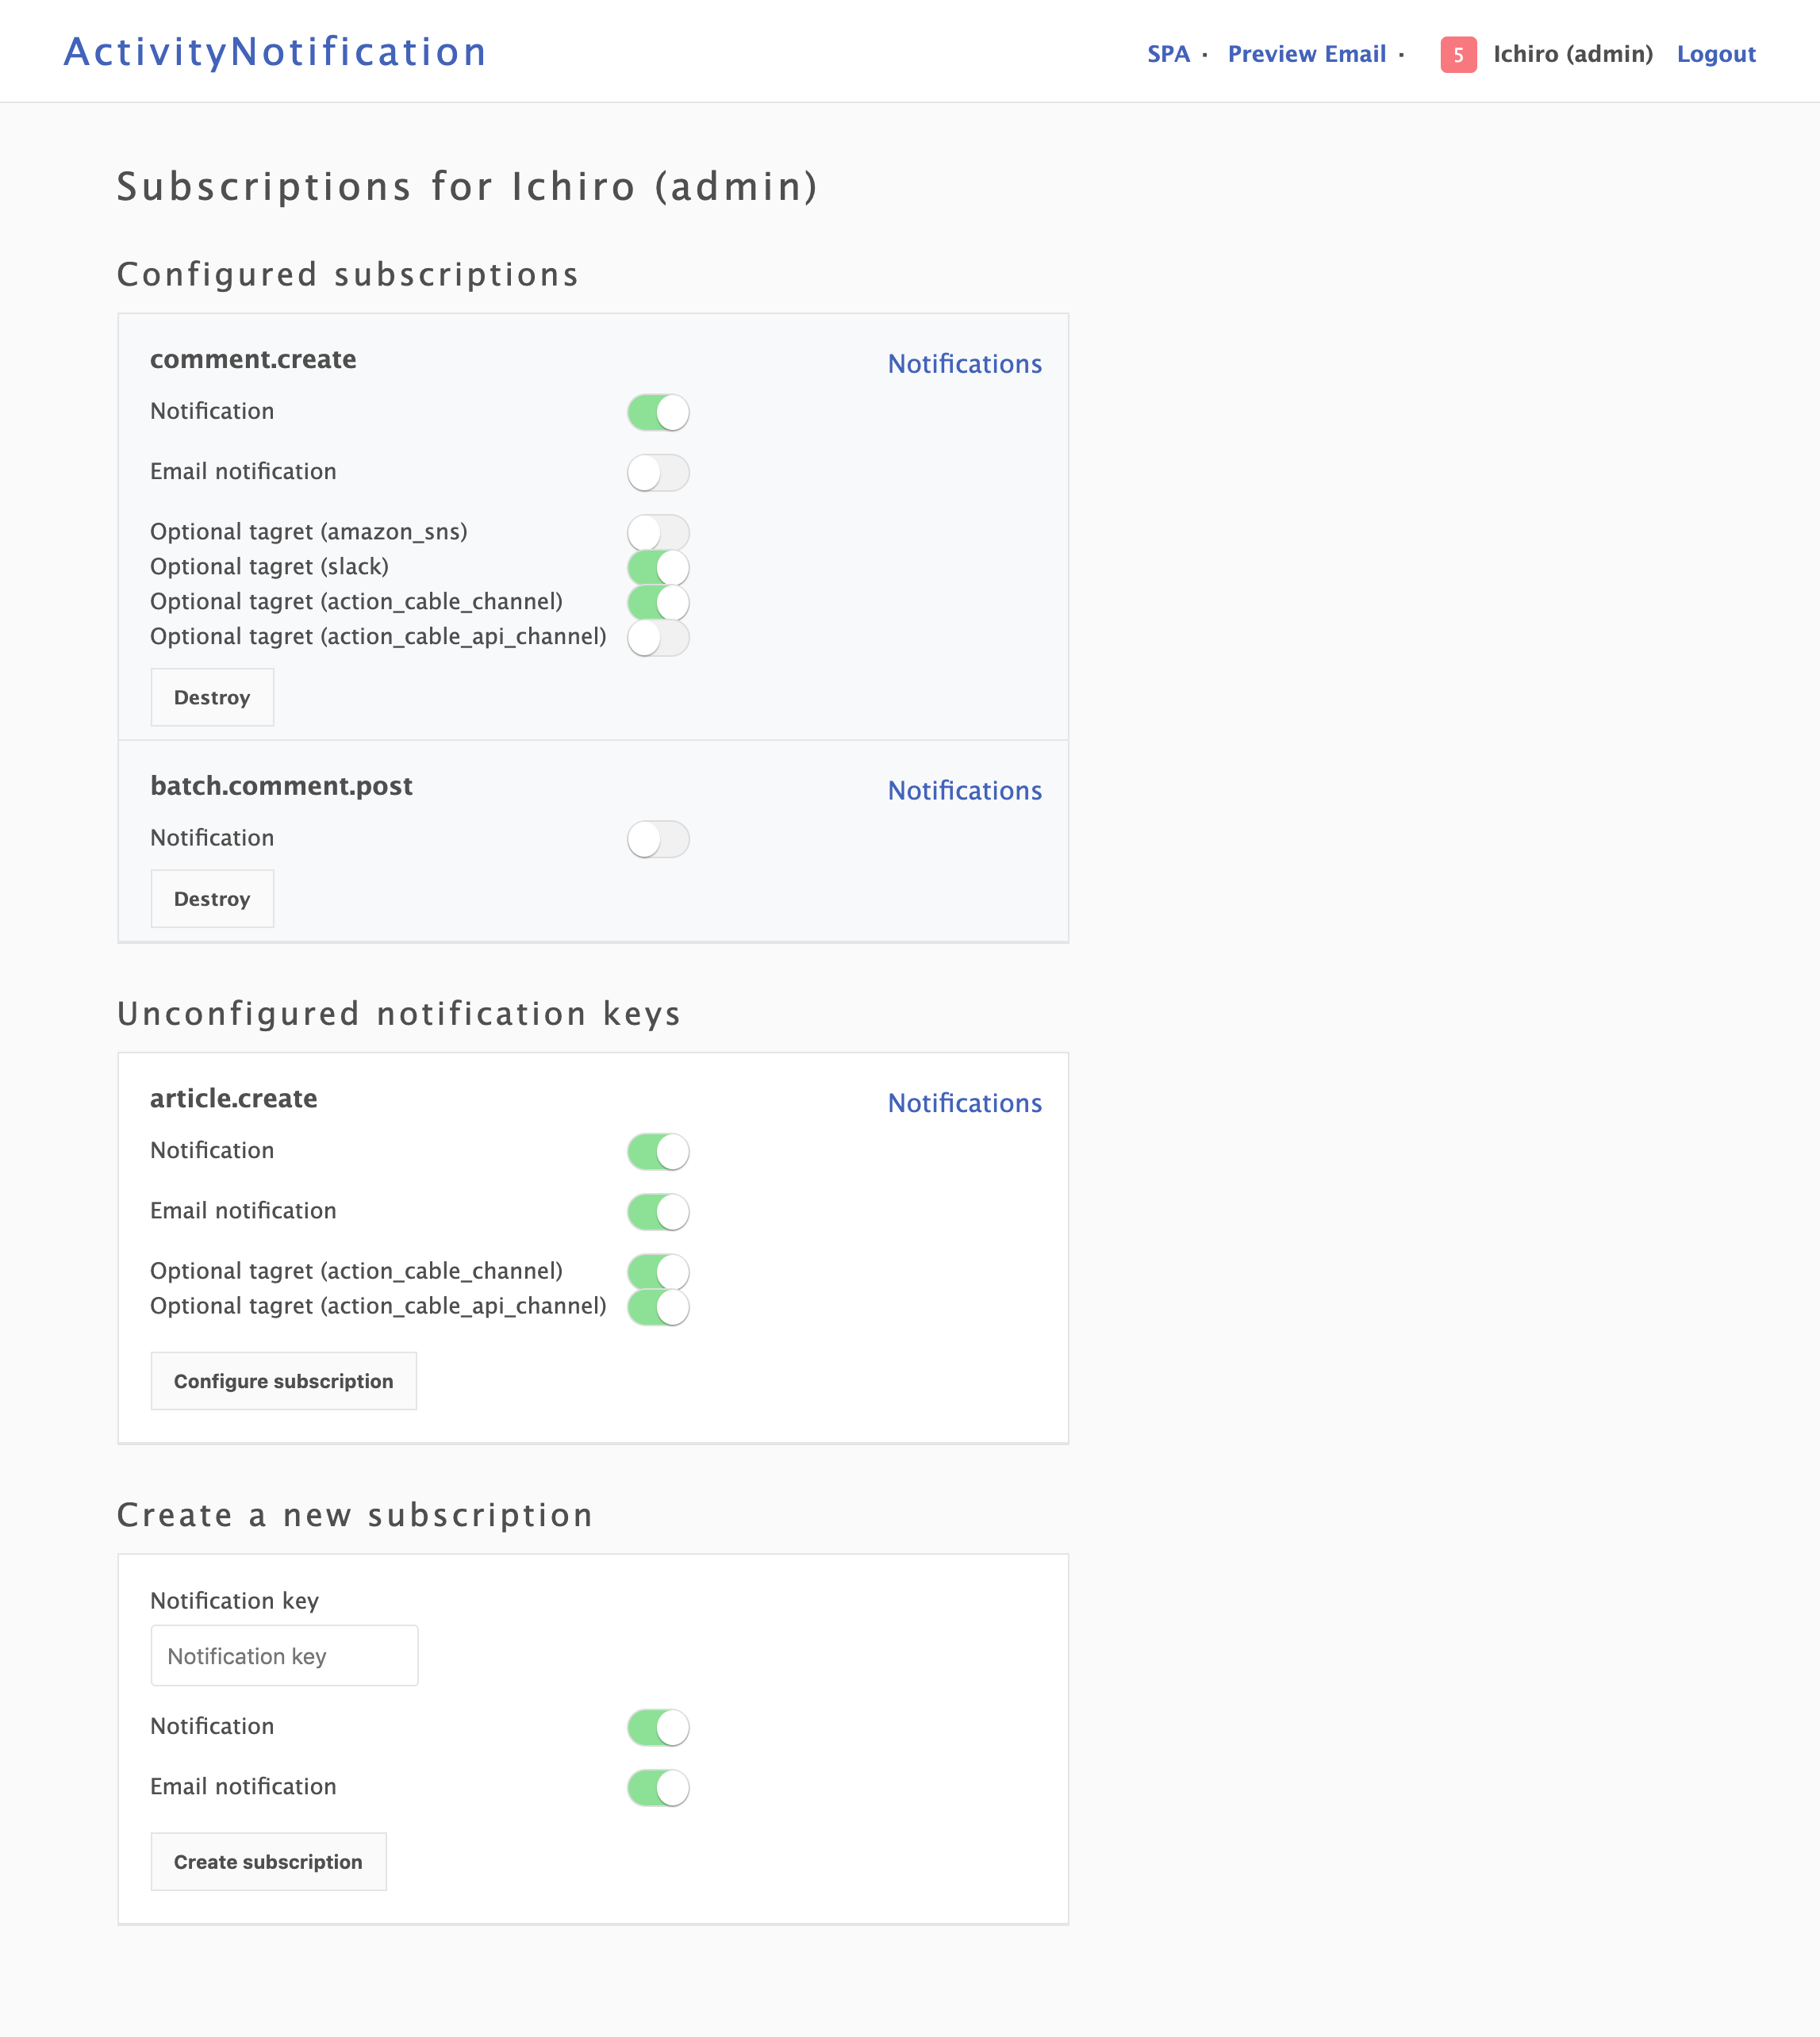
Subscription management of notifications
Amazon SNS as optional notification target

Slack as optional notification target
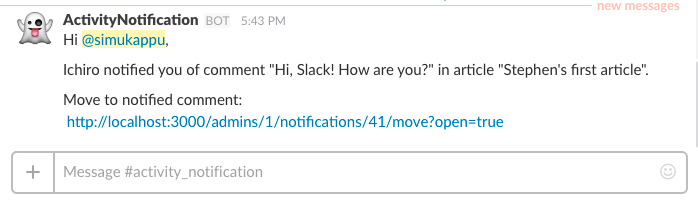
Table of contents
- About
- Setup
- Gem installation
- Database setup
- Using ActiveRecord ORM
- Using Mongoid ORM
- Using Dynamoid ORM
- Configuring models
- Configuring target models
- Configuring notifiable models
- Configuring views
- Configuring routes
- Routes with scope
- Creating notifications
- Notification API
- Asynchronous notification API with ActiveJob
- Automatic tracked notifications
- Displaying notifications
- Preparing target notifications
- Rendering notifications
- Notification views
- i18n for notifications
- Customizing controllers (optional)
- Functions
- Email notification
- Mailer setup
- Sender configuration
- Email templates
- Email subject
- i18n for email
- Batch email notification
- Batch mailer setup
- Batch sender configuration
- Batch email templates
- Batch email subject
- i18n for batch email
- Grouping notifications
- Subscription management
- Configuring subscriptions
- Managing subscriptions
- Customizing subscriptions
- Integration with Devise
- Configuring integration with Devise authentication
- Using different model as target
- Configuring simple default routes
- Push notification with Action Cable
- Enabling broadcasting notifications to channels
- Subscribing notifications from channels
- Subscribing notifications with Devise authentication
- Optional notification targets
- Configuring optional targets
- Customizing message format
- Amazon SNS as optional target
- Slack as optional target
- Developing custom optional targets
- Testing
- Documentation
- Common examples
- Help
- Contributing
- License
Setup
Gem installation
You can install activity_notification as you would any other gem:
$ gem install activity_notification
or in your Gemfile:
gem 'activity_notification'
After you install activity_notification and add it to your Gemfile, you need to run the generator:
$ bin/rails generate activity_notification:install
The generator will install an initializer which describes all configuration options of activity_notification. It also generates a i18n based translation file which we can configure the presentation of notifications.
Database setup
Using ActiveRecord ORM
When you use activity_notification with ActiveRecord ORM as default configuration, create migration for notifications and migrate the database in your Rails project:
$ bin/rails generate activity_notification:migration
$ bin/rake db:migrate
If you are using a different table name from "notifications", change the settings in your config/initializers/activity_notification.rb file, e.g., if you're using the table name "activity_notifications" instead of the default "notifications":
config.notification_table_name = "activity_notifications"
The same can be done for the subscription table name, e.g., if you're using the table name "notifications_subscriptions" instead of the default "subscriptions":
config.subscription_table_name = "notifications_subscriptions"
Using Mongoid ORM
When you use activity_notification with Mongoid ORM, set AN_ORM environment variable to mongoid:
$ export AN_ORM=mongoid
You can also configure ORM in initializer activity_notification.rb:
config.orm = :mongoid
You need to configure Mongoid in your Rails application for your MongoDB environment. Then, your notifications and subscriptions will be stored in your MongoDB.
Using Dynamoid ORM
When you use activity_notification with Dynamoid ORM, set AN_ORM environment variable to dynamoid:
$ export AN_ORM=dynamoid
You can also configure ORM in initializer activity_notification.rb:
config.orm = :dynamoid
You need to configure Dynamoid in your Rails application for your Amazon DynamoDB environment. Then, you can use this rake task to create DynamoDB tables used by activity_notification with Dynamoid:
$ bin/rake activity_notification:create_dynamodb_tables
After these configurations, your notifications and subscriptions will be stored in your Amazon DynamoDB.
Note: Amazon DynamoDB integration using Dynamoid ORM is only supported with Rails 5.0+.
Integration with DynamoDB Streams
You can capture activity_notification's table activity with DynamoDB Streams. Using DynamoDB Streams, activity notifications in your Rails application will be integrated into cloud computing and available as event stream processed by DynamoDB Streams Kinesis Adapter or AWS Lambda.
When you consume your activity notifications from DynamoDB Streams, sometimes you need to process notification records with associated target, notifiable or notifier record which is stored in database of your Rails application. In such cases, you can use store_with_associated_records option in initializer activity_notification.rb:
config.store_with_associated_records = true
When store_with_associated_records is set to false as default, activity_notification stores notificaion records with association like this:
{
    "id": {
        "S": "f05756ef-661e-4ef5-9e99-5af51243125c"
    },
    "target_key": {
        "S": "User#1"
    },
    "notifiable_key": {
        "S": "Comment#2"
    },
    "key": {
        "S": "comment.default"
    },
    "group_key": {
        "S": "Article#1"
    },
    "notifier_key": {
        "S": "User#2"
    },
    "created_at": {
        "N": "1560085332.689929"
    },
    "updated_at": {
        "N": "1560085332.695515"
    },
    "parameters": {
        "M": {}
    }
}
When you set store_with_associated_records to true, activity_notification stores notificaion records including associated target, notifiable and notifier like this:
{
    "id": {
        "S": "f05756ef-661e-4ef5-9e99-5af51243125c"
    },
    "target_key": {
        "S": "User#1"
    },
    "target_record": {
        "S": "{\"id\":1,\"email\":\"[email protected]\",\"name\":\"Ichiro\",\"created_at\":\"2019-06-09T13:10:44.853Z\",\"updated_at\":\"2019-06-09T13:10:44.853Z\"}"
    },
    "notifiable_key": {
        "S": "Comment#2"
    },
    "notifiable_record": {
        "S": "{\"id\":2,\"user_id\":2,\"article_id\":1,\"body\":\"This is the first Stephen's comment to Ichiro's article.\",\"created_at\":\"2019-06-09T13:10:45.677Z\",\"updated_at\":\"2019-06-09T13:10:45.677Z\"}"
    },
    "key": {
        "S": "comment.default"
    },
    "group_key": {
        "S": "Article#1"
    },
    "notifier_key": {
        "S": "User#2"
    },
    "notifier_record": {
        "S": "{\"id\":2,\"email\":\"[email protected]\",\"name\":\"Stephen\",\"created_at\":\"2019-06-09T13:10:45.006Z\",\"updated_at\":\"2019-06-09T13:10:45.006Z\"}"
    },
    "created_at": {
        "N": "1560085332.689929"
    },
    "updated_at": {
        "N": "1560085332.695515"
    },
    "parameters": {
        "M": {}
    }
}
Then, you can process notification records with associated records in your DynamoDB Streams.
Note: This store_with_associated_records option can be set true only when you use mongoid or dynamoid ORM.
Configuring models
Configuring target models
Configure your target model (e.g. app/models/user.rb). Add acts_as_target configuration to your target model to get notifications.
Target as an ActiveRecord model
class User < ActiveRecord::Base
  # acts_as_target configures your model as ActivityNotification::Target
  # with parameters as value or custom methods defined in your model as lambda or symbol.
  # This is an example without any options (default configuration) as the target.
  acts_as_target
end
Target as a Mongoid model
require 'mongoid'
class User
  include Mongoid::Document
  include Mongoid::Timestamps
  include GlobalID::Identification

  # You need include ActivityNotification::Models except models which extend ActiveRecord::Base
  include ActivityNotification::Models
  acts_as_target
end
Note: acts_as_notification_target is an alias for acts_as_target and does the same.
Configuring notifiable models
Configure your notifiable model (e.g. app/models/comment.rb). Add acts_as_notifiable configuration to your notifiable model representing activity to notify for each of your target model. You have to define notification targets for all notifications from this notifiable model by :targets option. Other configurations are options. :notifiable_path option is a path to move when the notification is opened by the target user.
Notifiable as an ActiveRecord model
class Article < ActiveRecord::Base
  belongs_to :user
  has_many :comments, dependent: :destroy
  has_many :commented_users, through: :comments, source: :user
end

class Comment < ActiveRecord::Base
  belongs_to :article
  belongs_to :user

  # acts_as_notifiable configures your model as ActivityNotification::Notifiable
  # with parameters as value or custom methods defined in your model as lambda or symbol.
  # The first argument is the plural symbol name of your target model.
  acts_as_notifiable :users,
    # Notification targets as :targets is a necessary option
    # Set to notify to author and users commented to the article, except comment owner self
    targets: ->(comment, key) {
      ([comment.article.user] + comment.article.commented_users.to_a - [comment.user]).uniq
    },
    # Path to move when the notification is opened by the target user
    # This is an optional configuration since activity_notification uses polymorphic_path as default
    notifiable_path: :article_notifiable_path

  def article_notifiable_path
    article_path(article)
  end
end
Notifiable as a Mongoid model
require 'mongoid'
class Article
  include Mongoid::Document
  include Mongoid::Timestamps

  belongs_to :user
  has_many :comments, dependent: :destroy

  def commented_users
    User.where(:id.in => comments.pluck(:user_id))
  end
end

require 'mongoid'
class Comment
  include Mongoid::Document
  include Mongoid::Timestamps
  include GlobalID::Identification

  # You need include ActivityNotification::Models except models which extend ActiveRecord::Base
  include ActivityNotification::Models
  acts_as_notifiable :users,
    targets: ->(comment, key) {
      ([comment.article.user] + comment.article.commented_users.to_a - [comment.user]).uniq
    },
    notifiable_path: :article_notifiable_path

  def article_notifiable_path
    article_path(article)
  end
end
Advanced notifiable path
Sometimes it might be necessary to provide extra information in the notifiable_path. In those cases, passing a lambda function to the notifiable_path will give you the notifiable object and the notifiable key to play around with:
acts_as_notifiable :users,
  targets: ->(comment, key) {
    ([comment.article.user] + comment.article.commented_users.to_a - [comment.user]).uniq
  },
  notifiable_path: ->(comment, key) { "#{comment.article_notifiable_path}##{key}" }
This will attach the key of the notification to the notifiable path.
Configuring views
activity_notification provides view templates to customize your notification views. The view generator can generate default views for all targets.
$ bin/rails generate activity_notification:views
If you have multiple target models in your application, such as User and Admin, you will be able to have views based on the target like notifications/users/index and notifications/admins/index. If no view is found for the target, activity_notification will use the default view at notifications/default/index. You can also use the generator to generate views for the specified target:
$ bin/rails generate activity_notification:views users
If you would like to generate only a few sets of views, like the ones for the notifications (for notification views) and mailer (for notification email views), you can pass a list of modules to the generator with the -v flag.
$ bin/rails generate activity_notification:views -v notifications
Configuring routes
activity_notification also provides routing helper for notifications. Add notify_to method to config/routes.rb for the target (e.g. :users):
Rails.application.routes.draw do
  notify_to :users
end
Then, you can access several pages like /users/1/notifications and manage open/unopen of notifications using ActivityNotification::NotificationsController. If you use Devise integration and you want to configure simple default routes for authenticated users, see Configuring simple default routes.
Routes with scope
You can also configure activity_notification routes with scope like this:
Rails.application.routes.draw do
  scope :myscope, as: :myscope do
    notify_to :users, routing_scope: :myscope
  end
end
Then, pages are shown as /myscope/users/1/notifications.
Creating notifications
Notification API
You can trigger notifications by setting all your required parameters and triggering notify on the notifiable model, like this:
@comment.notify :users, key: "comment.reply"
Or, you can call public API as ActivityNotification::Notification.notify
ActivityNotification::Notification.notify :users, @comment, key: "comment.reply"
The first argument is the plural symbol name of your target model, which is configured in notifiable model by acts_as_notifiable. The new instances of ActivityNotification::Notification model will be generated for the specified targets.
Hint: :key is a option. Default key #{notifiable_type}.default which means comment.default will be used without specified key.
You can override it by Notifiable#default_notification_key.
Asynchronous notification API with ActiveJob
Using Notification API with default configurations, the notifications will be generated synchronously. activity_notification also supports asynchronous notification API with ActiveJob to improve application performance. You can use notify_later method on the notifiable model, like this:
@comment.notify_later :users, key: "comment.reply"
You can also use :notify_later option in notify method. This is the same operation as calling notify_later method.
@comment.notify :users, key: "comment.reply", notify_later: true
Note: notify_now is an alias for notify and does the same.
When you use asynchronous notification API, you should setup ActiveJob with background queuing service such as Sidekiq. You can set config.active_job_queue in your initializer to specify a queue name activity_notification will use. The default queue name is :activity_notification.
# Configure ActiveJob queue name for delayed notifications.
config.active_job_queue = :my_notification_queue
Automatic tracked notifications
You can also generate automatic tracked notifications by :tracked option in acts_as_notifiable. :tracked option adds required callbacks to generate notifications for creation and update of the notifiable model. Set true to :tracked option to generate all tracked notifications, like this:
class Comment < ActiveRecord::Base
  acts_as_notifiable :users,
    targets: ->(comment, key) {
      ([comment.article.user] + comment.article.commented_users.to_a - [comment.user]).uniq
    },
    # Set true to :tracked option to generate automatic tracked notifications.
    # It adds required callbacks to generate notifications for creation and update of the notifiable model.
    tracked: true
end
Or, set :only or :except option to generate specified tracked notifications, like this:
class Comment < ActiveRecord::Base
  acts_as_notifiable :users,
    targets: ->(comment, key) {
      ([comment.article.user] + comment.article.commented_users.to_a - [comment.user]).uniq
    },
    # Set { only: [:create] } to :tracked option to generate tracked notifications for creation only.
    # It adds required callbacks to generate notifications for creation of the notifiable model.
    tracked: { only: [:create] }
end
class Comment < ActiveRecord::Base
  acts_as_notifiable :users,
    targets: ->(comment, key) {
      ([comment.article.user] + comment.article.commented_users.to_a - [comment.user]).uniq
    },
    # Set { except: [:update] } to :tracked option to generate tracked notifications except update (creation only).
    # It adds required callbacks to generate notifications for creation of the notifiable model.
    tracked: { except: [:update], key: 'comment.create.now', send_later: false }
end
Hint: #{notifiable_type}.create and #{notifiable_type}.update will be used as the key of tracked notifications.
You can override them by Notifiable#notification_key_for_tracked_creation and Notifiable#notification_key_for_tracked_update.
You can also specify key option in the :tracked statement.
As a default, the notifications will be generated synchronously along with model creation or update. If you want to generate notifications asynchronously, use :notify_later option with the :tracked option, like this:
class Comment < ActiveRecord::Base
  acts_as_notifiable :users,
    targets: ->(comment, key) {
      ([comment.article.user] + comment.article.commented_users.to_a - [comment.user]).uniq
    },
    # It adds required callbacks to generate notifications asynchronously for creation of the notifiable model.
    tracked: { only: [:create], key: 'comment.create.later', notify_later: true }
end
Displaying notifications
Preparing target notifications
To display notifications, you can use notifications association of the target model:
# custom_notifications_controller.rb
def index
  @notifications = @target.notifications
end
You can also use several scope to filter notifications. For example, unopened_only to filter them unopened notifications only.
# custom_notifications_controller.rb
def index
  @notifications = @target.notifications.unopened_only
end
Moreover, you can use notification_index or notification_index_with_attributes methods to automatically prepare notification index for the target.
# custom_notifications_controller.rb
def index
  @notifications = @target.notification_index_with_attributes
end
Rendering notifications
You can use render_notifications helper in your views to show the notification index:
<%= render_notifications(@notifications) %>
We can set :target option to specify the target type of notifications:
<%= render_notifications(@notifications, target: :users) %>
Note: render_notifications is an alias for render_notification and does the same.
If you want to set notification index in the common layout, such as common header, you can use render_notifications_of helper like this:
<%= render_notifications_of current_user, index_content: :with_attributes %>
Then, content named :notification_index will be prepared and you can use it in your partial template.
...
<%= yield :notification_index %>
...
Sometimes, it's desirable to pass additional local variables to partials. It can be done this way:
<%= render_notification(@notification, locals: { friends: current_user.friends }) %>
Notification views
activity_notification looks for views in app/views/activity_notification/notifications/:target with :key of the notifications.
For example, if you have a notification with :key set to "notification.comment.reply" and rendered it with :target set to :users, the gem will look for a partial in app/views/activity_notification/notifications/users/comment/_reply.html.(|erb|haml|slim|something_else).
Hint: the "notification." prefix in :key is completely optional, you can skip it in your projects or use this prefix only to make namespace.
If you would like to fallback to a partial, you can utilize the :fallback parameter to specify the path of a partial to use when one is missing:
<%= render_notification(@notification, target: :users, fallback: :default) %>
When used in this manner, if a partial with the specified :key cannot be located, it will use the partial defined in the :fallback instead. In the example above this would resolve to activity_notification/notifications/users/_default.html.(|erb|haml|slim|something_else).
If you do not specify :target option like this,
<%= render_notification(@notification, fallback: :default) %>
the gem will look for a partial in default as the target type which means activity_notification/notifications/default/_default.html.(|erb|haml|slim|something_else).
If a view file does not exist then ActionView::MisingTemplate will be raised. If you wish to fallback to the old behaviour and use an i18n based translation in this situation you can specify a :fallback parameter of :text to fallback to this mechanism like such:
<%= render_notification(@notification, fallback: :text) %>
Finally, default views of activity_notification depends on jQuery and you have to add requirements to application.js in your apps:
//= require jquery
//= require jquery_ujs
i18n for notifications
Translations are used by the #text method, to which you can pass additional options in form of a hash. #render method uses translations when view templates have not been provided. You can render pure i18n strings by passing { i18n: true } to #render_notification or #render.
Translations should be put in your locale .yml files as text field. To render pure strings from I18n example structure:
notification:
  user:
    article:
      create:
        text: 'Article has been created'
      update:
        text: 'Article %{article_title} has been updated'
      destroy:
        text: 'Some user removed an article!'
    comment:
      create:
        text: '%{notifier_name} posted a comment on the article "%{article_title}"'
      post:
        text:
          one: "<p>%{notifier_name} posted a comment on your article %{article_title}</p>"
          other: "<p>%{notifier_name} posted %{count} comments on your article %{article_title}</p>"
      reply:
        text: "<p>%{notifier_name} and %{group_member_count} other people replied %{group_notification_count} times to your comment</p>"
        mail_subject: 'New comment on your article'
  admin:
    article:
      post:
        text: '[Admin] Article has been created'
This structure is valid for notifications with keys "notification.comment.reply" or "comment.reply". As mentioned before, "notification." part of the key is optional. In addition for above example, %{notifier_name} and %{article_title} are used from parameter field in the notification record. Pluralization is supported (but optional) for grouped notifications using the %{group_notification_count} value.
Customizing controllers (optional)
If the customization at the views level is not enough, you can customize each controller by following these steps:
Create your custom controllers using the generator with a target:
$ bin/rails generate activity_notification:controllers usersIf you specify users as the target, controllers will be created in app/controllers/users. And the notifications controller will look like this:
class Users::NotificationsController < ActivityNotification::NotificationsController
  # GET /:target_type/:target_id/notifications
  # def index
  #   super
  # end

  # ...

  # POST /:target_type/:target_id/notifications/:id/open
  # def open
  #   super
  # end

  # ...
end
Tell the router to use this controller:
notify_to :users, controller: 'users/notifications'Finally, change or extend the desired controller actions.
You can completely override a controller action
class Users::NotificationsController < ActivityNotification::NotificationsController
  # ...

  # POST /:target_type/:target_id/notifications/:id/open
  def open
    # Custom code to open notification here

    # super
  end

  # ...
end
Functions
Email notification
activity_notification provides email notification to the notification targets.
Mailer setup
Set up SMTP server configuration for ActionMailer. Then, you need to set up the default URL options for the activity_notification mailer in each environment. Here is a possible configuration for config/environments/development.rb:
config.action_mailer. = { host: 'localhost', port: 3000 }
Email notification is disabled as default. You can configure it to enable email notification in initializer activity_notification.rb.
config.email_enabled = true
You can also configure them for each model by acts_as roles like these:
class User < ActiveRecord::Base
  # Example using confirmed_at of devise field
  # to decide whether activity_notification sends notification email to this user
  acts_as_target email: :email, email_allowed: :confirmed_at
end
class Comment < ActiveRecord::Base
  belongs_to :article
  belongs_to :user

  acts_as_notifiable :users,
    targets: ->(comment, key) {
      ([comment.article.user] + comment.article.commented_users.to_a - [comment.user]).uniq
    },
    # Allow notification email
    email_allowed: true,
    notifiable_path: :article_notifiable_path

  def article_notifiable_path
    article_path(article)
  end
end
Sender configuration
You can configure the notification "from" address inside of activity_notification.rb in two ways.
Using a simple email address as String:
config.mailer_sender = '[email protected]'
Using a Proc to configure the sender based on the notification.key:
config.mailer_sender = ->(key){ key == 'inquiry.post' ? '[email protected]' : '[email protected]' }
Email templates
activity_notification will look for email template in a similar way as notification views, but the view file name is not start with an underscore. For example, if you have a notification with :key set to "notification.comment.reply" and target_type users, the gem will look for a partial in app/views/activity_notification/mailer/users/comment/reply.html.(|erb|haml|slim|something_else).
If this template is missing, the gem will look for a partial in default as the target type which means activity_notification/mailer/default/_default.html.(|erb|haml|slim|something_else).
Email subject
activity_notification will use "Notification of #{@notification.notifiable.printable_type.downcase}" as default email subject. If it is defined, activity_notification will resolve email subject from overriding_notification_email_subject method in notifiable models. You can customize email subject like this:
class Comment < ActiveRecord::Base
  belongs_to :article
  belongs_to :user

  acts_as_notifiable :users,
    targets: ->(comment, key) {
      ([comment.article.user] + comment.article.commented_users.to_a - [comment.user]).uniq
    },
    notifiable_path: :article_notifiable_path

  def overriding_notification_email_subject(target, key)
    if key == "comment.create"
      "New comment to your article!"
    else
      "Notification for new comments!"
    end
  end
end
If you use i18n for email, you can configure email subject in your locale files. See i18n for email.
i18n for email
The subject of notification email can be put in your locale .yml files as mail_subject field:
notification:
  user:
    comment:
      post:
        text: "<p>Someone posted comments to your article</p>"
        mail_subject: 'New comment to your article'
Batch email notification
activity_notification provides batch email notification to the notification targets. You can send notification email daily, hourly or weekly and so on with a scheduler like whenever.
Batch mailer setup
Set up SMTP server configuration for ActionMailer and the default URL options for the activity_notification mailer in each environment.
Batch email notification is disabled as default. You can configure it to enable email notification in initializer activity_notification.rb like single email notification.
config.email_enabled = true
You can also configure them for each target model by acts_as_target role like this.
class User < ActiveRecord::Base
  # Example using confirmed_at of devise field
  # to decide whether activity_notification sends batch notification email to this user
  acts_as_target email: :email, batch_email_allowed: :confirmed_at
end
Then, you can send batch notification email for unopened notifications only to the all specified targets with batch_key.
# Send batch notification email to the users with unopened notifications
User.send_batch_unopened_notification_email(batch_key: 'batch.comment.post')
You can also add conditions to filter notifications, like this:
# Send batch notification email to the users with unopened notifications of specified key in 1 hour
User.send_batch_unopened_notification_email(batch_key: 'batch.comment.post', filtered_by_key: 'comment.post', custom_filter: ["created_at >= ?", time.hour.ago])
Batch sender configuration
activity_notification uses same sender configuration of real-time email notification as batch email sender. You can configure config.mailer_sender as simply String or Proc based on the batch_key:
config.mailer_sender = ->(batch_key){ batch_key == 'batch.inquiry.post' ? '[email protected]' : '[email protected]' }
batch_key is specified by :batch_key option. If this option is not specified, the key of the first notification will be used as batch_key.
Batch email templates
activity_notification will look for batch email template in the same way as email notification using batch_key.
Batch email subject
activity_notification will resolve batch email subject as the same way as email subject with batch_key.
If you use i18n for batch email, you can configure batch email subject in your locale files. See i18n for batch email.
i18n for batch email
The subject of batch notification email also can be put in your locale .yml files as mail_subject field for batch_key.
notification:
  user:
    batch:
      comment:
        post:
          mail_subject: 'New comments to your article'
Grouping notifications
activity_notification provides the function for automatically grouping notifications. When you created a notification like this, all unopened notifications to the same target will be grouped by article set as :group options:
@comment.notify :users key: 'comment.post', group: @comment.article
When you use default notification view, it is helpful to configure acts_as_notification_group (or acts_as_group) with :printable_name option to render group instance.
class Article < ActiveRecord::Base
  belongs_to :user
  acts_as_notification_group printable_name: ->(article) { "article \"#{article.title}\"" }
end
You can use group_owners_only scope to filter owner notifications representing each group:
# custom_notifications_controller.rb
def index
  @notifications = @target.notifications.group_owners_only
end
notification_index and notification_index_with_attributes methods also use group_owners_only scope internally.
And you can render them in a view like this:
<% if notification.group_member_exists? %>
  <%= "#{notification.notifier.name} and #{notification.group_member_count} other users" %>
<% else %>
  <%= "#{notification.notifier.name}" %>
<% end %>
<%= "posted comments to your article \"#{notification.group.title}\"" %>
This presentation will be shown to target users as Kevin and 7 other users posted comments to your article "Let's use Ruby".
You can also use %{group_member_count}, %{group_notification_count}, %{group_member_notifier_count} and %{group_notifier_count} in i18n text as a field:
notification:
  user:
    comment:
      post:
        text: "<p>%{notifier_name} and %{group_member_notifier_count} other users posted %{group_notification_count} comments to your article</p>"
        mail_subject: 'New comment to your article'
Then, you will see "Kevin and 7 other users posted 10 comments to your article".
Subscription management
activity_notification provides the function for subscription management of notifications and notification email.
Configuring subscriptions
Subscription management is disabled as default. You can configure it to enable subscription management in initializer activity_notification.rb.
config.subscription_enabled = true
This makes all target model subscribers. You can also configure them for each target model by acts_as_target role like this:
class User < ActiveRecord::Base
  # Example using confirmed_at of devise field
  # to decide whether activity_notification manages subscriptions of this user
  acts_as_target email: :email, email_allowed: :confirmed_at, subscription_allowed: :confirmed_at
end
If you do not have a subscriptions table in you database, create a migration for subscriptions and migrate the database in your Rails project:
$ bin/rails generate activity_notification:migration CreateSubscriptions -t subscriptions
$ bin/rake db:migrate
If you are using a different table name than the default "subscriptions", change the settings in your config/initializers/activity_notification.rb file, e.g, if you use the table name "notifications_subscription" instead:
config.subscription_table_name = "notifications_subscriptions"
Managing subscriptions
Subscriptions are managed by instances of ActivityNotification::Subscription model which belongs to target and key of the notification. Subscription#subscribing manages subscription of notifications. true means the target will receive the notifications with this key. false means the target will not receive these notifications. Subscription#subscribing_to_email manages subscription of notification email. true means the target will receive the notification email with this key including batch notification email with this batch_key. false means the target will not receive these notification email.
As default, all target subscribes to notification and notification email when subscription record does not exist in your database. You can change this subscribe_as_default parameter in initializer activity_notification.rb.
config.subscribe_as_default = false
Then, all target does not subscribe to notification and notification email and will not receive any notifications as default.
You can create subscription record from subscription API in your target model like this:
# Subscribe 'comment.reply' notifications and notification email
user.create_subscription(key: 'comment.reply')

# Subscribe 'comment.reply' notifications but does not subscribe notification email
user.create_subscription(key: 'comment.reply', subscribing_to_email: false)

# Unsubscribe 'comment.reply' notifications and notification email
user.create_subscription(key: 'comment.reply', subscribing: false)
You can also update subscriptions like this:
# Subscribe 'comment.reply' notifications and notification email
user.find_or_create_subscription('comment.reply').subscribe

# Unsubscribe 'comment.reply' notifications and notification email
user.find_or_create_subscription('comment.reply').unsubscribe

# Unsubscribe 'comment.reply' notification email
user.find_or_create_subscription('comment.reply').unsubscribe_to_email
Customizing subscriptions
activity_notification provides basic controllers and views to manage the subscriptions.
Add subscription routing to config/routes.rb for the target (e.g. :users):
Rails.application.routes.draw do
  subscribed_by :users
end
or, you can also configure it with notifications like this:
Rails.application.routes.draw do
  notify_to :users, with_subscription: true
end
Then, you can access users/1/subscriptions and use ActivityNotification::SubscriptionsController or ActivityNotification::SubscriptionsWithDeviseController to manage the subscriptions.
If you would like to customize subscription controllers or views, you can use generators like notifications:
- Customize subscription controllers
1. Create your custom controllers using controller generator with a target:

    ```console
    $ bin/rails generate activity_notification:controllers users -c subscriptions subscriptions_with_devise
    ```

2. Tell the router to use this controller:

    ```ruby
    notify_to :users, with_subscription: { controller: 'users/subscriptions' }
    ```
Customize subscription views
$ bin/rails generate activity_notification:views users -v subscriptions
Integration with Devise
activity_notification supports to integrate with devise authentication.
Configuring integration with Devise authentication
Add :with_devise option in notification routing to config/routes.rb for the target:
Rails.application.routes.draw do
  devise_for :users
  # Integrated with devise
  notify_to :users, with_devise: :users
end
Then activity_notification will use ActivityNotification::NotificationsWithDeviseController as a notification controller. The controller actions automatically call authenticate_user! and the user will be restricted to access and operate own notifications only, not others'.
Hint: HTTP 403 Forbidden will be returned for unauthorized notifications.
Using different model as target
You can also use different model from Devise resource as a target. When you will add this to config/routes.rb:
Rails.application.routes.draw do
  devise_for :users
  # Integrated with devise for different model
  notify_to :admins, with_devise: :users
end
and add :devise_resource option to acts_as_target in the target model:
class Admin < ActiveRecord::Base
  belongs_to :user
  acts_as_target devise_resource: :user
end
activity_notification will authenticate :admins notifications with devise authentication for :users. In this example, activity_notification will confirm admin belonging to authenticated user by Devise.
Configuring simple default routes
You can configure simple default routes for authenticated users, like /notifications instead of /users/1/notifications. Use :devise_default_routes option like this:
Rails.application.routes.draw do
  devise_for :users
  notify_to :users, with_devise: :users, devise_default_routes: true
end
If you use multiple notification targets with Devise, you can also use this option with scope like this:
Rails.application.routes.draw do
  devise_for :users
  # Integrated with devise for different model, and use with scope
  scope :admins, as: :admins do
    notify_to :admins, with_devise: :users, devise_default_routes: true, routing_scope: :admins
  end
end
Then, you can access /admins/notifications instead of /admins/1/notifications.
Push notification with Action Cable
activity_notification supports push notification with Action Cable by WebSocket.
activity_notification only provides Action Cable channels implementation, does not connections.
You can use default implementaion in Rails or your custom ApplicationCable::Connection for Action Cable connections.
Enabling broadcasting notifications to channels
Broadcasting notifications to Action Cable channels is disabled as default. You can configure it to enable Action Cable broadcasting in initializer activity_notification.rb.
config.action_cable_enabled = true
You can also configure them for each model by acts_as roles like these:
class User < ActiveRecord::Base
  # Allow Action Cable broadcasting
  acts_as_target action_cable_allowed: true
end
class Comment < ActiveRecord::Base
  belongs_to :article
  belongs_to :user

  acts_as_notifiable :users,
    targets: ->(comment, key) {
      ([comment.article.user] + comment.article.commented_users.to_a - [comment.user]).uniq
    },
    # Allow Action Cable broadcasting
    action_cable_allowed: true
end
Then, activity_notification will broadcast configured notidications to target channels by ActivityNotification::NotificationApi#broadcast_to_action_cable_channel method.
Subscribing notifications from channels
activity_notification provides ActivityNotification::NotificationChannel to subscribe broadcasted notifications with Action Cable.
You can simply create subscriptions for the specified target in your view like this:
<script type="text/javascript" src="https://cdnjs.cloudflare.com/ajax/libs/push.js/1.0.9/push.min.js"></script>
<script>
  App.activity_notification = App.cable.subscriptions.create(
    {
      channel: "ActivityNotification::NotificationChannel",
      target_type: "<%= @target.to_class_name %>", target_id: "<%= @target.id %>"
    },
    {
      connected: function() {
        // Connected
      },
      disconnected: function() {
        // Disconnected
      },
      rejected: function() {
        // Rejected
      },
      received: function(notification) {
        // Display notification

        // Push notificaion using Web Notification API by Push.js
        Push.create('ActivityNotification', {
            body: notification.text,
            timeout: 5000,
            onClick: function () {
                location.href = notification.notifiable_path;
                this.close();
            }
        });
      }
    }
  );
</script>
Then, activity_notification will push desktop notification using Web Notification API.
Subscribing notifications with Devise authentication
To use Devise integration, enable subscribing notifications with Devise authentication in initializer activity_notification.rb.
config.action_cable_with_devise = true
You can also configure them for each target model by acts_as_target like this:
class User < ActiveRecord::Base
  # Allow Action Cable broadcasting and enable subscribing notifications with Devise authentication
  acts_as_target action_cable_allowed: true, action_cable_with_devise: true
end
When you set action_cable_with_devise option to true, ActivityNotification::NotificationChannel will reject your subscription requests for the target type.
activity_notification also provides ActivityNotification::NotificationWithDeviseChannel to create subscriptions integrated with Devise authentication.
You can simply use ActivityNotification::NotificationWithDeviseChannel instead of ActivityNotification::NotificationChannel:
App.activity_notification = App.cable.subscriptions.create(
  {
    channel: "ActivityNotification::NotificationWithDeviseChannel",
    target_type: "<%= @target.to_class_name %>", target_id: "<%= @target.id %>"
  },
  {
    // ...
  }
);
You can also create these subscriptions with devise_type parameter instead of target_id parameter like this:
App.activity_notification = App.cable.subscriptions.create(
  {
    channel: "ActivityNotification::NotificationWithDeviseChannel",
    target_type: "users", devise_type: "users"
  },
  {
    // ...
  }
);
ActivityNotification::NotificationWithDeviseChannel will confirm subscription requests from authenticated cookies by Devise. If the user has not signed in, the subscription request will be rejected. If the user has signed in as unauthorized user, the subscription request will be also rejected.
In addtion, you can use Target#notification_action_cable_channel_class_name method to select channel class depending on your action_cable_with_devise configuration for the target.
App.activity_notification = App.cable.subscriptions.create(
  {
    channel: "<%= @target.notification_action_cable_channel_class_name %>",
    target_type: "<%= @target.to_class_name %>", target_id: "<%= @target.id %>"
  },
  {
    // ...
  }
);
This script is also implemented in default notifications index view of activity_notification.
Optional notification targets
activity_notification supports configurable optional notification targets like Amazon SNS, Slack, SMS and so on.
Configuring optional targets
activity_notification provides default optional target implementation for Amazon SNS and Slack. You can develop any optional target classes which extends ActivityNotification::OptionalTarget::Base, and configure them to notifiable model by acts_as_notifiable like this:
class Comment < ActiveRecord::Base
  belongs_to :article
  belongs_to :user

  require 'activity_notification/optional_targets/amazon_sns'
  require 'activity_notification/optional_targets/slack'
  require 'custom_optional_targets/console_output'
  acts_as_notifiable :admins, targets: [Admin.first].compact,
    notifiable_path: :article_notifiable_path,
    # Set optional target implementation class and initializing parameters
    optional_targets: {
      ActivityNotification::OptionalTarget::AmazonSNS => { topic_arn: 'arn:aws:sns:XXXXX:XXXXXXXXXXXX:XXXXX' },
      ActivityNotification::OptionalTarget::Slack  => {
        webhook_url: 'https://hooks.slack.com/services/XXXXXXXXX/XXXXXXXXX/XXXXXXXXXXXXXXXXXXXXXXXX',
        slack_name: :slack_name, channel: 'activity_notification', username: 'ActivityNotification', icon_emoji: ":ghost:"
      },
      CustomOptionalTarget::ConsoleOutput => {}
    }

  def article_notifiable_path
    article_path(article)
  end
end
Write require statement for optional target implementation classes and set them with initializing parameters to acts_as_notifiable. activity_notification will publish all notifications of those targets and notifiables to optional targets.
Customizing message format
Optional targets prepare publishing messages from notification instance using view template like rendering notifications.
As default, all optional targets use app/views/activity_notification/optional_targets/default/base/_default.text.erb.
You can customize this template by creating app/views/activity_notification/optional_targets/
Amazon SNS as optional target
activity_notification provides ActivityNotification::OptionalTarget::AmazonSNS as default optional target implementation for Amazon SNS.
First, add aws-sdk or aws-sdk-sns (>= AWS SDK for Ruby v3) gem to your Gemfile and set AWS Credentials for SDK (See Configuring the AWS SDK for Ruby).
gem 'aws-sdk', '~> 2'
# --- or ---
gem 'aws-sdk-sns', '~> 1'
require 'aws-sdk'
# --- or ---
require 'aws-sdk-sns'

Aws.config.update(
  region: 'your_region',
  credentials: Aws::Credentials.new('your_access_key_id', 'your_secret_access_key')
)
Then, write require 'activity_notification/optional_targets/amazon_sns' statement in your notifiable model and set ActivityNotification::OptionalTarget::AmazonSNS to acts_as_notifiable with :topic_arn, :target_arn or :phone_number initializing parameters.
Any other options for Aws::SNS::Client.new are available as initializing parameters. See API Reference of Class: Aws::SNS::Client for more details.
class Comment < ActiveRecord::Base
  require 'activity_notification/optional_targets/amazon_sns'
  acts_as_notifiable :admins, targets: [Admin.first].compact,
    optional_targets: {
      ActivityNotification::OptionalTarget::AmazonSNS => { topic_arn: 'arn:aws:sns:XXXXX:XXXXXXXXXXXX:XXXXX' }
    }
end
Slack as optional target
activity_notification provides ActivityNotification::OptionalTarget::Slack as default optional target implementation for Slack.
First, add slack-notifier gem to your Gemfile and create Incoming WebHooks in Slack (See Incoming WebHooks).
gem 'slack-notifier'
Then, write require 'activity_notification/optional_targets/slack' statement in your notifiable model and set ActivityNotification::OptionalTarget::Slack to acts_as_notifiable with :webhook_url and :target_username initializing parameters. :webhook_url is created WebHook URL and required, :target_username is target's slack user name as String value, symbol method name or lambda function and is optional.
Any other options for Slack::Notifier.new are available as initializing parameters. See Github slack-notifier and API Reference of Class: Slack::Notifier for more details.
class Comment < ActiveRecord::Base
  require 'activity_notification/optional_targets/slack'
  acts_as_notifiable :admins, targets: [Admin.first].compact,
    optional_targets: {
      ActivityNotification::OptionalTarget::Slack  => {
        webhook_url: 'https://hooks.slack.com/services/XXXXXXXXX/XXXXXXXXX/XXXXXXXXXXXXXXXXXXXXXXXX',
        target_username: :slack_username, channel: 'activity_notification', username: 'ActivityNotification', icon_emoji: ":ghost:"
      }
    }
end
Developing custom optional targets
You can develop any custom optional targets. Custom optional target class must extend ActivityNotification::OptionalTarget::Base and override initialize_target and notify method. You can use render_notification_message method to prepare message from notification instance using view template.
For example, create lib/custom_optional_targets/amazon_sns.rb as follows:
module CustomOptionalTarget
# Custom optional target implementation for mobile push notification or SMS using Amazon SNS.
class AmazonSNS < ActivityNotification::OptionalTarget::Base
require 'aws-sdk'
# Initialize method to prepare Aws::SNS::Client
def initialize_target( = {})
@topic_arn = .delete(:topic_arn)
@target_arn = .delete(:target_arn)
@phone_number = .delete(:phone_number)
@sns_client = Aws::SNS::Client.new()
end
# Publishes notification message to Amazon SNS
def notify(notification, = {})
@sns_client.publish(
topic_arn: notification.target.resolve_value(.delete(:topic_arn) || @topic_arn),
target_arn: notification.target.resolve_value(.delete(:target_arn) || @target_arn),
phone_number: notification.target.resolve_value(.delete(:phone_number) || @phone_number),
message: (notification, )
)
end
end
end
Then, you can configure them to notifiable model by acts_as_notifiable like this:
class Comment < ActiveRecord::Base
  require 'custom_optional_targets/amazon_sns'
  acts_as_notifiable :admins, targets: [Admin.first].compact,
    optional_targets: {
      CustomOptionalTarget::AmazonSNS => { topic_arn: 'arn:aws:sns:XXXXX:XXXXXXXXXXXX:XXXXX' }
    }
end
acts_as_notifiable creates optional target instances and calls initialize_target method with initializing parameters.
Testing
Testing your application
First, you need to configure ActivityNotification as described above.
Testing notifications with RSpec
Prepare target and notifiable model instances to test generating notifications (e.g. @user and @comment).
Then, you can call notify API and test if notifications of the target are generated.
# Prepare
@article_author = create(:user)
@comment = @article_author.articles.create.comments.create
expect(@article_author.notifications.unopened_only.count).to eq(0)

# Call notify API
@comment.notify :users

# Test generated notifications
expect(@article_author_user.notifications.unopened_only.count).to eq(1)
expect(@article_author_user.notifications.unopened_only.latest.notifiable).to eq(@comment)
Testing email notifications with RSpec
Prepare target and notifiable model instances to test sending notification email. Then, you can call notify API and test if notification email is sent.
# Prepare
@article_author = create(:user)
@comment = @article_author.articles.create.comments.create
expect(ActivityNotification::Mailer.deliveries.size).to eq(0)

# Call notify API and send email now
@comment.notify :users, send_later: false

# Test sent notification email
expect(ActivityNotification::Mailer.deliveries.size).to eq(1)
expect(ActivityNotification::Mailer.deliveries.first.to[0]).to eq(@article_author.email)
Note that notification email will be sent asynchronously without false as :send_later option.
# Prepare
include ActiveJob::TestHelper
@article_author = create(:user)
@comment = @article_author.articles.create.comments.create
expect(ActivityNotification::Mailer.deliveries.size).to eq(0)

# Call notify API and send email asynchronously as default
# Test sent notification email with ActiveJob queue
expect {
  perform_enqueued_jobs do
    @comment.notify :users
  end
}.to change { ActivityNotification::Mailer.deliveries.size }.by(1)
expect(ActivityNotification::Mailer.deliveries.first.to[0]).to eq(@article_author.email)
Testing gem alone
Testing with RSpec
Pull git repository and execute RSpec.
$ git pull https://github.com/simukappu/activity_notification.git
$ cd activity_notification
$ bundle install —path vendor/bundle
$ bundle exec rspec
  - or -
$ bundle exec rake
Testing with DynamoDB Local
You can use DynamoDB Local to test Amazon DynamoDB integration in your local environment.
At first, set up DynamoDB Local by install script:
$ bin/install_dynamodblocal.sh
Then, start DynamoDB Local by start script:
$ bin/start_dynamodblocal.sh
And you can stop DynamoDB Local by stop script:
$ bin/stop_dynamodblocal.sh
In short, you can test DynamoDB integration by the following step:
$ git pull https://github.com/simukappu/activity_notification.git
$ cd activity_notification
$ bundle install —path vendor/bundle
$ bin/install_dynamodblocal.sh
$ bin/start_dynamodblocal.sh
$ AN_ORM=dynamoid bundle exec rspec
Example Rails application
Test module includes example Rails application in spec/rails_app. You can run the example application as common Rails application.
$ cd spec/rails_app
$ bin/rake db:migrate
$ bin/rake db:seed
$ bin/rails server
Then, you can access http://localhost:3000 for the example application.
Run with your local database
As default, example Rails application runs with local SQLite database in spec/rails_app/db/development.sqlite3. This application supports to run with your local MySQL, PostgreSQL, MongoDB. Set AN_TEST_DB environment variable as follows.
To use MySQL:
$ export AN_TEST_DB=mysql
To use PostgreSQL:
$ export AN_TEST_DB=postgresql
To use MongoDB:
$ export AN_TEST_DB=mongodb
When you set mongodb as AN_TEST_DB, you have to use activity_notification with MongoDB. Also set AN_ORM like:
$ export AN_ORM=mongoid
You can also run this Rails application in cross database environment like these:
To use MySQL for your application and use MongoDB for activity_notification:
$ export AN_ORM=mongoid AN_TEST_DB=mysql
To use PostgreSQL for your application and use Amazon DynamoDB for activity_notification:
$ export AN_ORM=dynamoid AN_TEST_DB=postgresql
Then, configure spec/rails_app/config/database.yml or spec/rails_app/config/mongoid.yml, spec/rails_app/config/dynamoid.rb as your local database. Finally, run database migration, seed data script and the example appliation.
$ cd spec/rails_app
$ # You don't need migration when you use MongoDB only (AN_ORM=mongoid and AN_TEST_DB=mongodb)
$ bin/rake db:migrate
$ bin/rake db:seed
$ bin/rails server
Documentation
See API Reference for more details.
RubyDoc.info does not support parsing methods in included and class_methods of ActiveSupport::Concern currently. To read complete documents, please generate YARD documents on your local environment:
$ git pull https://github.com/simukappu/activity_notification.git
$ cd activity_notification
$ bundle install —path vendor/bundle
$ bundle exec yard doc
$ bundle exec yard server
Then you can see the documents at http://localhost:8808/docs/index.
Common examples
See example Rails application in /spec/rails_app.
You can also try this example Rails application as a online demo here: https://activity-notification-example.herokuapp.com/
You can login as test users to experience user activity notifications. For more details, see Online demo.
Help
We are welcome your Github issues for gem problems or enhancement requests.
Contributing
We are welcome all of your pull requests! Please check out the followings:
- Write tests with RSpec
- Write code docs and README if necessary
License
activity_notification project rocks and uses MIT License.