Sunzi
"The supreme art of war is to subdue the enemy without fighting." - Sunzi
Sunzi is the easiest server provisioning utility designed for mere mortals. If Chef or Puppet is driving you nuts, try Sunzi!
Sunzi assumes that modern Linux distributions have (mostly) sane defaults and great package managers.
Its design goals are:
- It's just shell script. No clunky Ruby DSL involved. Most of the information about server configuration on the web is written in shell commands. Just copy-paste them, rather than translate it into an arbitrary DSL. Also, Bash is the greatest common denominator on minimum Linux installs.
- Focus on diff from default. No big-bang overwriting. Append or replace the smallest possible piece of data in a config file. Loads of custom configurations make it difficult to understand what you are really doing.
- Always use the root user. Think twice before blindly assuming you need a regular user - it doesn't add any security benefit for server provisioning, it just adds extra verbosity for nothing. However, it doesn't mean that you shouldn't create regular users with Sunzi - feel free to write your own recipes.
- Minimum dependencies. No configuration server required. You don't even need a Ruby runtime on the remote server.
What's new:
Please see the CHANGELOG.
Quickstart
Install:
$ [sudo] gem install sunzi
Go into your project directory (if it's a Rails project, config would be a good place to start with), then:
$ sunzi create
It generates a sunzi folder along with subdirectories and templates. Inside sunzi, there are sunzi.yml and install.sh. Those two are the most important files that you mainly work on.
Go into the sunzi directory, then run sunzi deploy:
$ cd sunzi
$ sunzi deploy example.com
Now, what it actually does is:
- Compile
sunzi.ymlto generate attributes and retrieve remote recipes, then copy files into thecompileddirectory - SSH to
example.comand login asroot - Transfer the content of the
compileddirectory to the remote server and extract in$HOME/sunzi - Run
install.shon the remote server
As you can see, all you need to do is edit install.sh and add some shell commands. That's it.
A Sunzi project without any recipes or roles is totally fine, so that you can start small, go big as you get along.
Commands
$ sunzi                                           # Show command help
$ sunzi compile                                   # Compile Sunzi project
$ sunzi create                                    # Create a new Sunzi project
$ sunzi deploy [user@host:port] [role] [--sudo]   # Deploy Sunzi project

$ sunzi setup [linode|digital_ocean]              # Setup a new VM on the cloud services
$ sunzi teardown [linode|digital_ocean]           # Teardown an existing VM on the cloud services
Directory structure
Here's the directory structure that sunzi create automatically generates:
sunzi/
  install.sh      # main script
  sunzi.yml       # add custom attributes and remote recipes here

  recipes/        # put commonly used scripts here, referred from install.sh
    sunzi.sh
  roles/          # when role is specified, scripts here will be concatenated
    db.sh         # to install.sh in the compile phase
    web.sh
  files/          # put any files to be transferred
  compiled/       # everything under this folder will be transferred to the
                  # remote server (do not edit directly)
How do you pass dynamic values?
There are two ways to pass dynamic values to the script - ruby and bash.
For ruby (recommended): Make sure eval_erb: true is set in sunzi.yml. In the compile phase, attributes defined in sunzi.yml are accessible from any files in the form of <%= @attributes.ruby_version %>.
For bash: In the compile phase, attributes defined in sunzi.yml are split into multiple files in compiled/attributes, one per attribute. Now you can refer to it by $(cat attributes/ruby_version) in the script.
For instance, given the following install.sh:
echo "Goodbye <%= @attributes.goodbye %>, Hello <%= @attributes.hello %>!"
With sunzi.yml:
attributes:
  goodbye: Chef
  hello: Sunzi
Now, you get the following result.
Goodbye Chef, Hello Sunzi!
Remote Recipes
Recipes can be retrieved remotely via HTTP. Put a URL in the recipes section of sunzi.yml, and Sunzi will automatically load the content and put it into the compiled/recipes folder in the compile phase.
For instance, if you have the following line in sunzi.yml,
recipes:
  rvm: https://raw.github.com/kenn/sunzi-recipes/master/ruby/rvm.sh
rvm.sh will be available and you can refer to that recipe by source recipes/rvm.sh.
You may find sample recipes in this repository useful: https://github.com/kenn/sunzi-recipes
Role-based configuration
You probably have different configurations between web servers and database servers.
No problem - how Sunzi handles role-based configuration is refreshingly simple.
Shell scripts under the roles directory, such as web.sh or db.sh, are automatically recognized as a role. The role script will be appended to install.sh at deploy, so you should put common configurations in install.sh and role specific procedures in the role script.
For instance, when you set up a new web server, deploy with a role name:
sunzi deploy example.com web
It is equivalent to running install.sh, followed by web.sh.
Cloud Support
You can setup a new VM, or teardown an existing VM interactively. Use sunzi setup and sunzi teardown for that.
The following screenshot says it all.
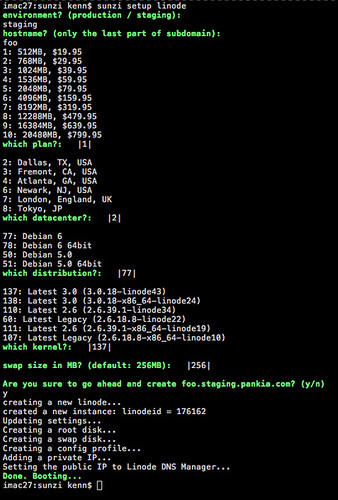
Right now, only Linode and DigitalOcean are supported.
For DNS, Linode and Amazon Route 53 are supported.
Vagrant
If you're using Sunzi with Vagrant, make sure that you have a root access via SSH.
An easy way is to edit Vagrantfile:
Vagrant::Config.run do |config|
  config.vm.provision :shell do |shell|
    shell.path = "chpasswd.sh"
  end
end
with chpasswd.sh:
#!/bin/bash

sudo echo 'root:vagrant' | /usr/sbin/chpasswd
and now run vagrant up, it will change the root password to vagrant.
Also keep in mind that you need to specify the port number 2222.
$ sunzi deploy localhost:2222