Artoo Adaptor For Raspberry Pi
This repository contains the Artoo (http://artoo.io/) adaptor for the Raspberry Pi (http://www.raspberrypi.org/) tiny Linux computer's General Purpose Input/Output (GPIO).
Artoo is a open source micro-framework for robotics using Ruby.
For more information about Artoo, check out our repo at https://github.com/hybridgroup/artoo


Installing On Raspberry Pi
If you do not already have Ruby installed, first you'll need to:
sudo apt-get install ruby ruby1.9.1-dev
Despite one of the packages being titled "ruby1.9.1-dev", the above command will install Ruby 1.9.3 (as of January 2013) and the Ruby dev tools.
Then install the artoo-raspi gem:
sudo gem install artoo-raspi
Using
connection :raspi, :adaptor => :raspi
device :board, :driver => :device_info
device :led, :driver => :led, :pin => 17

work do
  puts "Firmware name: #{board.firmware_name}"
  puts "Firmata version: #{board.version}"

  every 1.second do
    led.toggle
  end
end
To run the examples, requires sudo access on the Raspberry Pi:
sudo ruby examples/raspi_led.rb
Devices supported
The following hardware devices have driver support via the artoo-gpio gem:
- Button
- LED
Connecting to Raspberry Pi GPIO
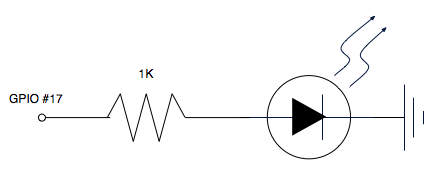
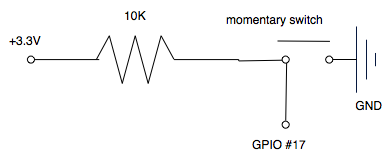
This gem only works on a real Raspberry Pi. Do not bother trying on any other kind of computer it will not work. Also note you will need to connect actual circuits to the Raspberry Pi's GPIO pins. Here is an example of wiring the circuits for the GPIO to connect a single LED:
To add the button used in the example, add a momentary contact switch to the circuit.
Enabling the Raspberry Pi i2c on raspbian
You must add these two entries in your /etc/modules
i2c-bcm2708
i2c-dev
You must also ensure that these entries are commented in your /etc/modprobe.d/raspi-blacklist.conf
#blacklist spi-bcm2708
#blacklist i2c-bcm2708
Now restart your raspberry pi.
Enabling PWM output on GPIO pins.
You need to install and have pi-blaster running in the raspberry-pi, you can follow the instructions for pi-blaster install on our repo here:
https://github.com/hybridgroup/pi-blaster
Contributing
- Fork it
- Create your feature branch (
git checkout -b my-new-feature) - Commit your changes (
git commit -am 'Add some feature') - Push to the branch (
git push origin my-new-feature) - Create new Pull Request